Thursday, April 19, 2012

And the hat goes on...

 Everyone that had an opinion about the hat told us, yes , ribbon!   So here is my dad in the final coat and hat with ribbon.  The coat has had some revisions since christmas- buttons, a snap in the back  to attach the hood to the coat and belt loops.  That's Honey de Belgian's big sweet face  taking up most of the picture. Focus on the hat- if you can. 
My family went out to TN to visit my dad for spring break. We took some pictures of him in his Father Christmas   outfit so we will have them for Christmas.  But it is only April, you say, why so early?? Well, I work slow. Dad knows that if we do it now, I will have them edited and ready for Christmas. And he hinted about some Christmas in July fun. 


These are the girls: Belle is on the left and Honey is on the right. 
  My daughter and I have renamed them: we are calling them  
Vanilla Cupcake and Caramel Custard Cup.   
These girls are  carriage and buggy horses. They pull a carriage around Lynchburg & Fayetteville . They are all muscle.  And sugar & spice and everything nice.

I wish you could smell them through the computer screen. Have you ever shoved your nose into a horses neck? They smell heavenly. Just stick to the neck end. That other end can be not so nice. 
  
I did not make their hats.  I had no idea there were special christmas hats for horses.  The things you learn when visiting a farm... 

I am going to try another version of the hat. It worked great for pictures and fits nicely, but the inside is a mess. It is lined but the top of the hat, I could not get smooth and it is just bugging me.  The coat is perfect and I want the hat to be perfect, inside and out.  

The back of the coat


Honey is off the hook- she is done with pictures and headed back to her pasture. She is very patient for pictures. 

Dad said he needed something to carry the coat in so I made a garment bag for the coat as well. I used clear vynil and bias tape.   Sewing on the clear vinyl isn't bad, it is just very slow going. 

Next year, I will make santa outfits for the horses. 
Naaaa, just kidding. Can you see fitting  a horse that big? 

If you would like to see more of Honey  & Belle  doing what they do  hop on over to
or 


Wednesday, April 4, 2012

Blue and White

I finished up these cushions  this morning.  These are for Judy, a super good friend of my Mom-in-law. These cushions  will go in wicker chairs at Judy's beach cottage.   
I love the bright blue denim with the contrasting white trim.  The white duck cording makes a beautiful crisp  outline to the cushions.  Because they are made of a denim and cotton these cushion covers can be machine washed!    Practical as well as pretty!


These chairs are in  Rob & Judy's great room at the cottage.  Soon, I will be starting on  the drapery panels for the sliding doors  and valances  that will go in the room. The valances and panels will be the white duck edged in denim bands  or denim cording.  They are going to be gorgeous!

There are two seat cushions and two back square cushions.


I did a sort-of lapped zipper in the seam. The zipper is  hidden.  

Now that I have blogged about them, I guess I should go call Judy and  let her know they are done :) 

Tuesday, April 3, 2012

I'm too sexy for this hat


I am working on the hat to go with my dad's father christmas  suit.  The coat has a hood on  but he can't wear the hood all the time. 

He needs to choose:  ribbon on the hat  or no.  So I took pictures and we all can vote! :) 


The hat without the ribbon. 


The line of stitching near the top of the hat will go away-
that is just a line of basting stitches to keep the hat
in shape will I worked with the center. 


The hat with the ribbon 


It's the attack of the  Holly Jolly Hat!!!!EHHHHHHHH!


This is the top of the hat.  It will smooth out a bit more and not be so 'pointy'  when I am all done. 

I look like an elf taking a picture. 

Here  is my dad wearing the suit standing next to Honey, the prettiest girl in Lynchburg, TN.   :)  
You can look at this and get an idea of how the hat will go with the suit. 


So tell me ....

 Yes ribbon 
or 
No ribbon? 


Tuesday, March 27, 2012

The itchy, see through, floppy fabric Perfect Shirt


Donna, my awesome Tuesday night student :) , chose this  shirt pattern to make for our current project together. We looked through my patterns and  this one really appealed to her. I have had it in my stash for a  while, I just hadn't gotten around to making it yet. This shirt has no buttons or zippers so again she avoids closures of any kind (The next item will have a zipper. Or buttons or anything. You can't avoid them forever, Donna! :) :) ) I liked all of the options that the pattern came with.

 I like to have made a pattern made up at least once before I teach it, to work out any issues  it may have.  So I got to making a shirt real quick before the next weeks lesson with Donna. 
I made a shirt but Donna is converting the pattern over to a nightgown. She has planned for it to be white eyelet , much longer and  flared out at the bottom. She is using the flutter sleeves for extra comfortableness.  ( Is that a word- comfortableness? Did I just make up a word?) 


I did not make a muslin with this.  I'm such a risk taker! No not really. This pattern didn't have any darts or any thing I needed to work out, so  I just fit as I sewed. I added some extra room to the front gather under the inset when I cut it out and moved the gather mark up the neckline.  I took up a lot in   the shoulders and the back seam .  That's it. 
 The fabric I found  I really like. It is flowy and very nice for spring and summer.   It was also   sooooo flip floppy when working with it.  I could not get it to stay in place when cutting , or pinning, or any of the process. 
For the inset, I used an  iron on  tear away stabilizer applied to the wrong side of the fabric,  to apply the lace.  I tried it without stabilizer on a test piece and it slip-slided all over the place. I couldn't get the lace straight. Because there are little stripes in the fabric, it is very obvious when the lace was crooked. 
Soooooo I iron on the stabilizer and stitched the vintage lace on with tiny zig zag stitches. They disappear nicely into lace. 
The lace is vintage lace collected over the years from thrift stores, yard sales, estate sales and who knows where else I got it from. I have had it forever. I use little pieces in projects here and there.  


 I tried it on after I got the sleeves basted in and was going to wear it during a lesson one morning to test it out before I finished off the seams, but I ended up tearing it off after a few minutes . It itched so bad!!!    It was insanely itchy!! There are little tiny clear threads running through the fabric which gives it a really  neat tiny shimmer in the sun.  However those little tiny clear threads are evil little imitators. Any cut edge of fabric  that touched my skin  had those little tiny threads in it. Sooooooo each seam in this shirt is either french seams or bias tape / binding covered. Every one. Not a raw edge anywhere. Even  where the bubble on the end of the sleeve attaches- all covered in binding. So my quick  little shirt which should have taken no time at all took a few days.
Inside the shirt, the seam allowances are covered in bias  tape binding.

     The edges of the neckline are in binding of the same fabric but packaged bias tape could be used in place of  it and look awesome. I pulled out some black bias tape to see if I could do it on this shirt but  the blacks were different .  :(  However, on Donna's nightgown, white bias tape will be used.  This will speed up the construction time on this a lot.

     The sleeves were super puffy on the first go round. I had added some extra room in the sleeves for my massive shoulders  and that created a some super pouf at the  top sleeve seam. I risked the itchiness and put it back on to take this  picture of the sleeves before I took them off.  Those sleeves were  costumy. I wanted a vintage feel to the shirt but sometimes too many details can look like  a costume.


      I like the bubble a the bottom of the sleeve.  I wasn't sure about it when I was making it but after wearing it a couple of times- it is very comfortable.


Here are  the sleeves getting ready to have the binding attached and some top edge  'pouf ' removed. .


      I took pictures outside this time as it is a black shirt and those haven't been showing up too well in photos inside my dark dungeon house. Here is the shirt in full sun so you can see all the details ... and right through it.


Look Dad! I am on the Internets in a see-through shirt!


When the photos loaded up on the computer I realized this shirt is see through. (My husband: Yea I noticed that, I thought you knew.  Me: Noooooooooooo I did not know it was this see through. Thanks for the heads up on that one,  honey :) )  And the majorly see through part isn't even on good stuff- like my boobs. :) :)  It highlights my stomach.  Not groovy.  In the wearings after these photos were taken, I wore a black undershirt. Problem solved. :)


This  is as glamorous as it gets, standing in the front yard, in the overgrown winter garden, in a see through shirt whilst the elderly neighbor walks his dog past.

I love this shirt. After solving the  King Henry sleeve pouf and the Itchy and Scratchy  problems it has become the Perfect Shirt.  It is extremely comfortable and  I have worn it  many times now. 

Friday, March 23, 2012

Kayla's Holiday Skirt

         Kayla made this skirt in December/ January.  We were trying to get it finished up for holiday parties but life intervened. It does that sometimes. Two  of my Saturday Girls -Nina and Kayla both made skirts.  I don't have  a picture of Nina in her skirt  for you but I will pester her until I get one :) !

           We used the First Skirt lesson, that everybody that takes lessons from me does if you want to  make clothing. I cover a lot  in that skirt lesson so when we do a pattern, it makes more sense!   We changed it up a bit : instead of using one width of 45 wide fabric, we used 2! 90 inches around! This skirt has an elastic   waist.  It also features an attached 'crinoline'. Organza  is cut to the same measurements as the skirt and then when the casing is sewn down at the top of the skirt, the crinoline is sewn into at the same time.  The crinoline is not itchy as it is just one tiny hem at the bottom. I put in the crinoline hem for the girls-  organza can be slippery but everything else was sewn by them!

      Kayla  is my girl for really taking a pattern and making it her own. I love it.  I present the idea and the plan and she takes it and runs with it. Some times I have to rein her back in just a tiny bit so that we have some chance of completing the item in this lifetime. :) :)   For this skirt she added pockets AND a ruffle at the bottom. And it looks awesome!

      The incredible  amount of  fabric ( 90 inches around! )  is pulled up by the elastic at the waist. This along with the crinoline gives the skirt a bit of pouf without  looking like a square dance costume. Perfect for middle school holiday parties!

      When Nina put in the elastic she was shaking her head at me.  She did not see how 90 inches was going to fit her little skinny mini waist. She was sure  it wasn't going to fit her and I had to tell her over and over told her to trust me, it will fit. When we got the elastic and I had her try it on she was so funny. Oh, it does fit!!

        Kayla did an amazing job at this skirt!  It took a bit of patience there at the end because each step took a while to complete.  Hemming  150 inches of ruffle takes a lot of patience!! Ruffling it and attaching  it takes even more! She hung in there and got it done.  


 Great Job Kayla!!! :) :) 

Tuesday, March 6, 2012

Molly's Birthday Dress

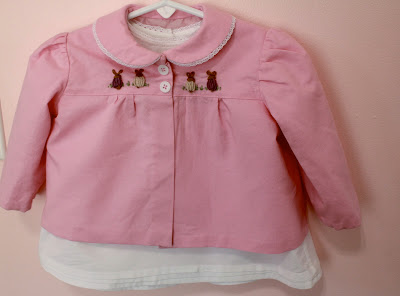
My niece  Molly will be one year old this month!  I made her a birthday dress & coat.
 I used a Simplicity re-issue 2629 from 1948. I made the little dress in the upper right corner of the pattern envelope and the pink  jacket  pictured under that to go over it. 


I followed the pattern  except I cut the dress much shorter. Molly is crawling a lot and I didn't want the dress to be so long that it caught up under her knees and could hinder her crawling . Babies get very annoyed by that! I added pin tucks by the bottom hem.  I also added a lining to the inside of the coat .  The lining makes it much more comfortable to wear and much easier to get on and a wiggly baby! :)
Here she is in the dress:

I embroidered little bunnies onto the dress & jacket. 
 The instructions for the bunnies are in  Sew Cute Couture. This book is lovely to look  at but I doubt I will ever do any of the smocking in the book.  Seems very   time consuming. I love some of the embroidered embellishments  in the book. It uses buttons and embroidery and they are all adorable.  The simplicity pattern came with a pretty floral design but I  liked the bunnies better. The bunnies are boullion knots with lazy daisies for ears.  I love these bunnies for a baby item, even better as it is near Easter!


Those were the tiniest buttons I have ever sewn onto anything. 


The pintucks were very time consuming as they needed to be just perfect to look right.
I love the tiny lace on the sleeves.  I bought the tiniest lace I could find. 

Here is the little jacket over the dress.

Some of the purple fabric marker is still  visible around the bunnies.
I marked lines on the fabric so the bunnies were evenly spaced  and level. 
The lining was not attached yet. 
The entire lining was  hand sewn in. I didn't want any stitch lines visible on the outside. 

The sleeves are pinned up and ready to be hand sewn in. 


I put a little label in the jacket  & the dress.
It has the year on it so it can be dated in later years. I am going to try to
 put labels in everything I make from now on. 

Inside out front

Inside out back 


Molly was getting sleepy as it was near bedtime.
I was very happy the little coat fit her perfectly! I made the 12 month size and  hoped for the best.


 Molly loved the coat hanger  best of all. 

Sleepy baby. 

When it warms up a bit, I am going to take more pictures of Moly in her dress and then turn them to black & white. If I print them on super glossy paper and rough the up a touch, they will look like 1948 prints ! :) :)

Saturday, March 3, 2012

Saturday Girls

 Today was a wonderful day! Today is Saturday and I teach 5 girls throughout the day starting at 9, ending at 4:30.  Today all the girls remembered all of their stuff, sewed slowly and carefully and had fun! I love days like this! 
I am so proud of them, I took pictures today to show off thier creations

At 9 am each Saturday Kayla comes  dancing in the door.  She is so much fun to start the day out with. She makes sure I am awake! She finished her  apron today! Kayla did such a wonderful job of stitching the bias tape onto the edges of the apron
See me in the reflection of the mirror? I am waving at you! :) 
 Kayla added buttons onto the top part of her apron for embellishment. We had planned a pocket but  she changed her mind and just wanted to add  buttons.
 See me again? Behind Kayla?

Izzy is next at 10:30. Today we covered her sewing notebook. I am having each girl keep  a sewing notebook. I write in it each week what we did, homework and our plan for next time. It helps to keep them ( and me! )  on track with what we are doing. We use a plain black & white composition notebook and cover it with a  fabric of their choice.  It is a great one hour project  and they love to use it each week.

Izzy is cutting out her interfacing. 
Izzy chose a piece of leftover fabric from my daughter's  bedroom valances.  I keep all fabric scraps. :)  They are great for projects like this that don't need too much fabric.
Izzy did a fantastic job of hemming the inside  pieces and slowly stitching around the entire  cover!
The outside of her notebook
The inside cover of her notebook. 


Nine is at 12. I am so proud of Nina today!!! But look at these photos- Nina  is even more proud of herself. Look at her smile!  This is the practice version  we made to test out a pattern for a summer dress. We made a shirt first just to check for fit. 


Nina really used her sewing skills on this one-  gathering,  a nice hem, creating straps- she did it all herself! I did put in the zipper for her, we haven't covered those yet.  She will shop for fabric for her dress this next two weeks and we then  start on her  dream version. 


We had 10 minutes left in lesson and she decided that the shirt just needed something. So we looked in my ribbon  box and she found a ribbon that she liked and  we added it where the bodice connects to the lower part of the shirt. She is also going to add buttons where the straps meet the top of the bodice.
I just love how  confident she looks! She is so happy with her work and she should be!
 That smile is fantastic! She is so proud of what she made!

Tori is at 2. She is working on her Pajama pants. Here she is cutting the material. We have already made the muslin version, tested it for fit, altered the pattern to make those adjustments and are on on the real thing. I love the fabrics she chose. She is  doing a black & orange zebra print on one leg and black on the other leg.  They are going to be awesome!!!

I did get a picture of Tori smiling but she would not want me to post it here-  I caught her mid laugh so.... not the most flattering angle! :)  So you get serious Tori face as she is  cutting out her fabric. 

Haley comes to lesson at 3:30. Haley is finishing up her circle skirt.  She is my last lesson  of the day and such a sweet girl- I really enjoy teaching her.  :)
Haley learned the  lesson of wash your fabric before you make your item with this skirt . She found a lovely fabric with small flowers on it, washed the fabric and the flowers disappeared!! She still wanted to use it for the skirt,  so we did but  it is good that the fading happened before she made the skirt. 

Haley put in a lovely half inch double fold hem on her circle skirt. 
The front of her skirt
The back of her skirt. 

The skirt isn't totally finished. We just need to finish off the button flaps and stitch down the waistband.

I told her to please tell her dad that I did not plan  for this skirt to be this short! :) :)  She wanted it this way . She promised me to wear leggings underneath :) !