Showing posts with label dresses. Show all posts

Wednesday, September 12, 2012

I made something I saw on Pinterest!

Yes, I did something I saw on Pinterest!! Yea me! 
I think there should be applause or trumpets or something  that sounds when you do something you see online. They could boast your accomplishment for you.   You could say " Hear that world?  These are the trumpets of productivity proving I am not just sitting here staring at pinterest for hours. "  
My life needs an applause and trumpet button.  Somebody get me one, ok? :)


I made this dress at the beginning of summer but never got around to posting about it.   It was a busy summer! Now that  E is back in school  I have much more quiet computer time. 
Today I have computer time because my car will not start. I am not going anywhere.  I had to cancel my appt with a student  that I was so looking forward to and am  really bummed. Sorry Carolann!! 
So with my new found free time today I will catch up on the blog! :) 

I really wanted to share this dress  because it was my go to dress all summer.  I would literally  pull it out of the dryer and out it on.   It doesn't need ironing or hand washing or any  attention at all. Just wash and wear. It is so comfortable. I love this  fabric - it  very soft.  The elastic makes it super flexible so I could do anything in it.  I wore  it to dinners out, dinners in, play dates, birthday parties, playing on the beach ( the ruffle at the bottom does get  unbelievably  heavy if you misjudge a wave and get wet- just a heads up for ya if you plan on making one and wearing it to the seaside),  going to see bands, end of summer camp programs,  grocery shopping, and   for hanging out at home. Oh and teaching lessons too- My students saw this dress weekly.   Kayla has pointed it out to me a couple of times that I wear this dress a lot on  lesson Saturdays.  :) Yes,  I have worn it most teaching days because it is easy to put on  at 8:30 on  summer Saturday mornings and look like I made effort to get dressed for work. Pulled it right out of the dryer...

Yep. That's Sophie behind me. Just hanging out. Chillin'. 

Here is the inspiration dress:


Isn't it lovely? When I pinned it  I  thought it would be a fantastic dress for summer.  And super easy. When I read the tutorial I realized that the pattern she used for the bodice was very much like  a peasant  top pattern I had for eden. I graded the pattern up to my size, which was gloriously easy: added  to the top of the neckline and sleeves, widened the back & front bodice, lengthened the sleeve and  lowered the armscye. That was it.
 I ordered the same fabric she used in her dress for mine but in black. Of course.  It is a black cotton gauze. It isn't stretchy, but due to the tiny folds in the fabric, it acts stretchy. There is elastic at the neckline, sleeves and where the bodice meets the skirt.


Again,  Sophie is standing behind me.  No pup head shots  at all  in any of these pictures.
 Just side dog. 

I had planned on adding the ruffles on each tier like my inspiration dress but on me, the ruffles just seemed bulky. They didn't look romantic on me. They just kinda made me look fatter.  So I ditched that idea and  just did one longer ruffle at the bottom of the dress.
There are three tiers  in the skirt , I just did not attach the smaller ruffles onto them. The gathering and attaching of the three tiers  and then the bottom ruffle TAKE. FOREVER. Seriously. A fraking long time.    But, I do have to say for this dress, it was totally worth it.  I want to make another one I just have not found the right fabric yet.   For the next dress I am only going to change one thing: I am going to use a different method for  the elastic at the waist. The tutorial says to sew the elastic onto the seam allowance on the inside and I am going to do that.  For this dress, I felt the because the skirt is a little heavy, I needed  a wider elastic. I made a channel out of the bodice seam allowance on the inside. It is ok,  I looks nice, I just want something less visible on the next one.

I love this dress.  Now, in September , it is showing the love. It has faded a bit. I am going to re-dye it black and  wear it all fall and winter.

At the neckline, I used a method from the Kids Peasant Top pattern. I folded the top hem to the inside  then sewed bias tape over that raw edge. I inserted the elastic though the bias tape.  The method gives you a  little ruffle at the top edge and I liked that detail. 

I love this dress  because the elastic keeps the dress close to my body. I can lean over without flashing!
And wow!  can you tell this picture is from the beginning of summer?  That is  one pale  face. :)  :) 


 My student April made this dress too this summer! She was a bit pregnant and wanted a comfy long dress. This fabric has tiny little silver stripes in it and was beautifully thin and breezy.   Doesn't she look lovely for  being almost ready to  have the baby? :)   She also chose to skip the ruffles on the tiers .


April also made a top from the pattern. She used an awesome pink and black plaid .    April decided after making the dress and the top that she was done with gathering and ruffles for a while. Luckily , she had a baby boy so she won't be ruffling any baby clothes.  :)  Baby Dalton is finally here and SO CUTE! He has the most adorable little baby chin you have ever seen :) :

Yea!  A photo with Sophie's face in it- not just her side!


Wednesday, August 22, 2012

Peacocks and Paisleys - Naney's Birthday dress

My niece Naney turned three recently and I made her a birthday dress!!
I made a test run in the spring- the Puppies And Kitties Dress.  I made a couple  of changes to the fit: lowered the armscye, took  in an inch at the neck so it didn't gape and made it longer. And it is perfect!
 I used the Olivia's Best Dress as a base for this dress. I used the little ruffle sleeves from another toddler dress and the band at the bottom of the bodice idea from the Bebe dress. I  call this Franken-sewing; mixing and matching pieces from different patterns. 

The Olivia dress calls for using 7 fat quarters. I couldn't find enough  co-ordinating fat quarters so I had  to get a couple of the fabrics in half yards. That worked out better as I had more freedom in choosing what fabric went where. 
On vacation this summer I asked Naney what her favorite color is. I wanted to make the dress in her favorite color. Well, it was green one day and then  purple the next. On the last day at the beach she leaned over to me and whispered that her favorite color was red!  So with these fabrics, no matter what her favorite color is that day,  it is on her dress! :)
These fabrics can also be worn at any time during the year. With the lower armscye, Naney can wear her dress over t-shirts or even turtle necks in the winter.  And these colors will be so cute in the spring!

 
My favorite fabrics on the dress were the peacock fabric and the paisley.


I put a label in the dress so she knows when it was made just for her. On vacation this year, she accidentally called me Uncle Stacye, and it stuck.  I think it is adorable! I will happily be Uncle Stacye! :) :) 
So I put that in the label too!  How fun when she is bigger to have her little funny sayings inside her clothes. 
The neckline is topstitched in a fun swirly stitch. This helps to keep the lining in place. 


The bottom hem is also  topstitched in a decorative stitch. It is hidden in some of the busier fabrics but you can see it pretty well here on the stripe.

Here is the inside. I stitched the strips together with a small seam allowance, trimmed it and then zigzagged over them together.  This should help the dress not need to be ironed as much- no seams to press open.   


 The little sleeves are so easy to create on little  dresses and top. Draw a large oval. Press it in half lengthwise.  Run a gathering stich along the raw edge- gather and insert!

I had a couple of people ask me how long it took to make this dress. It  looks like it is a time consuming dress but it really isn't. I have made a bunch of this style dresses and so I have the order of construction down pat.   Putting the skirt together is all straight stitches and  zig zags,  and it went by pretty past. 
I would say this dress took about 4 hours. it took longer to choose what fabrics to use!

 Here is the birthday girl modeling  her dress!!!

Spinning around....

Go me- it's my birthday! Go me!

Happy Birthday to me!


 All that twirling makes you thirsty! Gotta have a juice box!
I love the look of total concentration,  trying to get the straw inserted in the box.

Happy Birthday Naney!

Tuesday, July 31, 2012

All American Girl


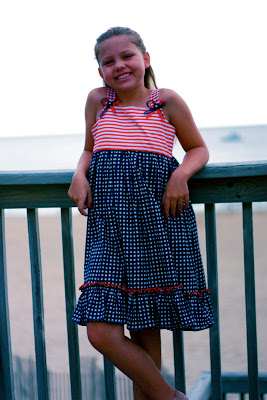
My Mom-in-law found the cutest 4th of July dresses  for the grandbabies summer picture.  Each year  on vacation we are taking pictures of the girls in matching outfits. She couldn't find a dress that matched in  Eden's size, so I made one!  ( Last year I made all three outfits, this year was much easier. Hooray! :) ) 
I took a picture of the baby's dress, then hunted down the right  fabrics. Sounds easy enough to find  navy & white stars and red & white stripes, right?  No, not really. They were a bit elusive  but I finally found the exact matches online. 

This is the baby's dress.

I used this pattern AGAIN. I know this pattern now inside & out, backwards and forwards. I have made 5 or 6 versions of this now. It is  so easy to alter and change up, each version looks different!  Eden loves each version , they have been her favorite for two years now.   When she grows out of this, we are going to have a crisis- what pattern will we go to for everything???


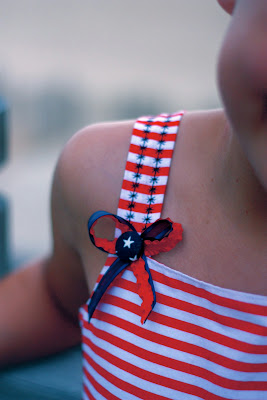
On July 4, Eden and I went to Michael's in search of ribbons  to put on the straps. They had nothing- we wanted stars and stripes and crazy  patriotic ribbons but it was all gone. They put it out so early and then it is all gone by the holiday.  I guess you have to get your July 4 stuff around Valentines Day. 
 (Halloween is out right now, people. It is July.  Halloween!)
We found navy ribbons and red ribbon  in the regular ribbon aisle and that had to do. 


The inside is lined in plain white cotton. I think it might even be white drapery lining...  Rock on Roclon Drapery Lining! I always have small cuttings of drapery lining hanging around. When  washed, drapery lining  does great as a clothing lining.  I didn't want to use the stripe to line it as I didn't want the stripe show thought the fabric on the outside.


Lining up the stripes was fun. I pinned at each stripe and sewed sloooooooowly. The entire bodice is topstitched  at the top edge to give it more structure. 


The ruffle was attached to the dress on the outside.  There is  about 170 inches of ruffle on the bottom edge of this dress!!!   I thought it might be too much, as I was gathering it, but Eden loves it. It is her favorite part of the dress. 
To look just like the babies dresses, I satin stitched the top edge of the ruffle in red thread. I used a short length zig zag and went over it like 8 times, around and around and around the ruffle loop. That took  forever- maybe an hour and a half. But it felt like forever, sitting there zig zagging and zig zagging and zig zagging.... 
I gathered it and attached it to the bottom of the dress skirt with two rows of stitching.  One row just didn't seem like it was going to hold up that insane amount of ruffle! 


 This is the underneath of the ruffle- I attached it to the skirt  and then just zig zagged the bottom edge of the skirt to keep it from unraveling. 
The bottom edge  of the ruffle is a rolled hem . I used the  1/4 inch size rolled hem foot.  

Here is Eden  on the deck in Nag's Head. 

My shy girl. 


The back of the dress

On the straps, I used an heirloom stitch on my machine and a wing needle. I thought it kinda looks like fireworks !
The ribbons on the straps , meant to match the little ones dresses, actually cover up a booboo. I tried to get the straps sewn on so that the stripes  went in the right order, meaning the top row of the bodice is a white stripe so the first stripe showing on the straps should have been red. Uhm.....it didn't go quite like that. After re-doing it three times after it came out crooked or on the white stripe not the red,  I said  something like "to heck with this" only a little less PG . 
I put ribbons and a button over it and done! You can't tell underneath is all crazy crooked stripes of the wrong color. :) :) !!!!
I did make this dress about an inch  big around her chest. I would like for her to get to wear it next year too.  I ended up spending a good chunk of time on a dress she has worn....3 times. By making it just a tad big, she might be able to wear it three times next year!  


So, how did the picture of all the babies turn out, you ask?
Here is the best picture!
Molly is the little one being held up by Eden and Naney is standing next to Eden. Aren't they adorable?
The ribbons on E's dress didn't end up in the photo but other than that- how cute is this??


It is extremely difficult getting a good shot of multiple babies.  They just don't get the picture taking process. "You mean you want me to stand still and smile and look at the camera? Aunt Stacye, you're so  funny!" We just wanted one picture of them all together, looking in the same-ish direction.  The photo above is the winner: all the girls in one photo, looking sort of at me.  I also got some cute, cute shots of the  girls  in their dresses looking everywhere but at me, and running in every direction!

I  love this photo- Naney is trying to grab Molly's hand and
  Molly is just trying to get back to her mommy.
 Eden is trying her best to herd the sweet
 little baby sheep together so I can take the picture!


This is my favorite photo of my baby. 
My all american girl with a gorgeous summer smile!! 


Happy Summer! 


Friday, July 6, 2012

Bebe Dress Sew-a-long Part 3 Make the muslin

***7/6/12  This post is unfinished- it is missing some photos but I wanted to get it up quick so that Kristi has photos while she is working on her muslin 
:) 


Today I sewed up my muslin for The Bebe dress and I am so excited! It looks great! This pattern is beautifully drafted and easy to alter. I am going to show the process I used today to  fit this pattern to me. If you have any questions or problems- comment and I  help you!


 I transfered the dart markings from the pattern-  to the muslin using good old fashioned carbon paper and a tracing wheel .     The carbon ink is permanent so only do this on muslin!  I like to use carbon paper on muslins as the lines are bright and clear to see.   And it is  dark enough for you to see in photographs. On the real version I will use either dressmakers carbon paper or a disappearing fabric pen. I do not care for the wax free dressmakers tracing paper, the kind that is chalk. It is just  a personal preference. 


Ok! let's get crackin'!! :) 

Snip a tiny snip at the edge of the darts- do this to each dart leg. This makes it easier to line up the dart legs.  be sure it is tiny! The seam allowance on this dress is 1/2- DO NOT GO PAST THAT.   We just want a tiny snip to see where the legs are when folding them together. 

The pattern instructs us to fold the darts right through the dart point.  I then finger creased the fold.  Finger creasing is using - yep! your fingers to put in a crease or mark . I got everything lined up and smushed down on the fabric with my fingers. An iron could  put a permanent crease here and we just want the crease to hold long enough for us to make sure the darts are perfectly lined up. 
I lined up the dart legs while making sure the crease went right through the dart point. This took a couple of minutes so don't worry if it takes  a couple of tries to get it right on the point. 


I put a pin in the the dart point first and work out from there. The pin at the dart point makes sure that when you sew, the dart  doesn't move. Pin the dart in place, checking to make sure the dart legs are matched up.  You can also stick  a pin though one side of the dart leg and look at the other side to make sure both legs are exactly lined up. 


Put a pin in the dart point to ensure accuracy  on your dart.

Set your machine on  the longest straight stitch you have- a basting stitch. We are going to baste the muslin together.   This allows us to just pull thread out super fast  if we need to make changes.  Thread up your machine with a dark or bright  colored thread.  This allows us to easily  see stitching lines when trying it on.  
  Sew from the raw edge of the dart to the point , SLOWLY.  At the tip of the dart point sew off the edge one or two stitches. Lift up your presser foot and pull the fabric away form the machine and clip the threads, leaving long tails. Tie these threads together with two knots. Do not trim the threads - leave the threads long in case you need to pull them out to change the dart. 


Do this to all four darts. Press. Press the side darts downward and the smaller under bust darts towards the center. 
The pattern instructs us to trim the  side bust darts down to 3/8. We will not do this on the muslin as we are doing this for fit, not to wear, and if we trim it, we cannot make adjustments. 

All of the darts have been sewn and it is ready for pressing. 

FIT AS YOU SEW.
Try on the bodice at each stage when construction it. 
You can tell a lot at this stage by just holding the bodice up to you and looking.  A great way to do it is wear a form fitting t-shirt and pin the muslin front to the t-shirt. That way your hands are free to mark and pin. 
  I discovered that on me the under bust darts extended too far up. Not by too much, but enough that it made my  girls look kinda funny shaped.  I measured using my seam gauge and the dart was @ 1 inch too high.  The side bust darts were just fine.


The bodice front  is  pinned to my shirt
so I can look at it on me.
The flash went off for some reason. Sorry :) 


I removed the stitching in the under bust darts,  measured down one inch and made a dot. I drew a straight line from the dot to the dart legs original position. Then I  re-stitched the dart, still using a basting stitch. 


After the darts are all done  and pressed,  stitch  front  bodice to the back bodice pieces. 


I put in a zipper for fitting. It is just to hold the dress together as it will be in the final version so I can get a good look at the fit. It is basted in, I can rip it our and reuse it on something else. 
By putting a zipper, in it tightens the bodice around me and I get a very good look at how it is fitting. if you leave the muslin loose,  you aren't getting an accurate fit. 


XX pic of zipper XXX


Now under bust darts have been adjusted and look much better.

The side bust darts are a touch poufy at the tip. On the real version I will solve this by either tapering the dart farther away from the tip or by sewing the dart on a curve.   I will photograph this so you can see ot/ 


Everything fit nice but there was an extra bit of fabric just under the arm. I measured 1/2 inch in from the top edge of the side seam , and drew a line angling down to the original seam allowance at the bottom of the side seam  and then sewed on this line. This took out the floppy bit at the top edge.


XXXX picture of side seamXXXX


I tried it  on one more time (fit as you sew! fit as you sew!)  and it felt wonderful. Nice fit, nice dart placement, I'm happy!


To get an even  better idea of how the  dress will look when finished, I folded down the seam allowance  on the neckline and one arm to see exactly where the seams would sit on my body.  
Using a medium length stitch (2.5-3.5) stitch away from the raw edge of the neckline and armscyes  on the seam line. This pattern has a seam allowance of 1/2 inch. ( Most commercial patterns are 5/8 inch  so be sure  to look and use what each  pattern calls for)
Make tiny snips up to the stitching line. I did it every inch or so. 
then press the seam allowance to the inside.


 It will look like this.

 Then try it on.  Now I know exactly where the neckline will fall.  The neckline on this dress is perfection, not too low-cut but not nun-like either.
     By folding in the armscye seam allowance, I could see where the seam would actually be. On the left side of the picture ( my right arm)  you can see how the fabric is flat around  the arm, just like it should be. On the right side of the picture, there is some gathering just under my arm. This is taken care of when the seam allowance is removed, as it will be when the dress is sewn together.


 While I was working on this, I took notes or each alteration I made.  I usually use a piece of paper taped up onto the wall so that as I stand in front of the mirror, I can easily write it down.

WRITE DOWN EACH THING YOU DO, even if you think you will remember it , because it is easy to forget what you have done.


My crazy cracker handwriting says:

  •  lower the under bust dart by 1 inch
  • take in side seam 1/2 inch angled from top of seam to bottom
  • add 1/2 inch more to bottom of bodice - total 11/2 inch. 
  • stitch a curved dart seam  on the side darts  to reduce puffiness in the dart tip. 
Ok!!! Muslin made, next  we will talk about fabric choices!!!


Thursday, July 5, 2012

Bebe Dress Sew-a-long Part 2 Determining size

In this post I am going to talk about determining what size to cut the pattern out. When first starting out, it can be a bit tricky  reading size charts, choosing a size and then making any alterations to the pattern. 


Here is the size chart for the Bebe Dress.


Size Chart
XXSXSSMLXLXXL
Bust32343638404244
Waist24262830323436
Hip34363840424446


The instructions state that the bust measurement is the most critical  to choosing fit for this pattern .  As this dress is loose around the hips and tummy, we really only need to look at the bust measurement.

   Step 1
 Measure. 
 We need to take two measurements : An actual  bust and over bust.

Actual bust- measure at the fullest part of your bust.
image from Sew La Blog 
Over bust- measure above the bust just under your armpits.
image from Sew La Blog 


 If there is a difference of 2 inches or less  between those two measurements you can use the pattern as it is  without altering. Just   look on the chart and use your actual bust size.


If there is a difference of 3 inches or more, you will need to make a full bust adjustment.  A full bust adjustment alters the pattern to provide more room just where it is needed: in the bust. This way the shoulders and neckline fit  and are not too big. Most patterns are drafted for a B cup.  This dress is drafted for a C cup.  If you are larger than a C cup   do a full bust adjustment.


In the Bebe Pattern  booklet, Kay Whit recommends looking at the Full Bust adjustment  on Sew LAs Website... here is the link:     Sew La Bog Full Bust Adjustment  I am not going to do one here as  the one on the link is just fantastic and I really don't think I could explain it any clearer :)


My measurements are 38 over bust and 42 bust.   That is a difference of 4 inches. Yes,  I need to do an FBA.

  When looking at the pattern, if I go by my overbust measurement of 38, I would need to cut out a medium. I have pretty broad shoulders and would like for this dress to be a tad loose for summer, so I am going to cut out a large and do a full bust adjustment of two inches.  The large is 40 inches, my  bust measurement is 42.

If I were to cut out the XL, which is a bust 42, yes it would fit around my ample  bosom.  But it would be too big  in the neckline, the sleeves, everywhere.  The rest of my body is a medium/large.  My front is just super-duper extra large :)

 I photocopied the bodice top because it makes it easier for you to see exactly what I have done to the pattern piece.   I find that photocopying works very well for pattern altering, especially bodices as  tracing can be a bit inexact.  (This also works in cases of laziness when you don't feel like tracing it. )

Once you have made the changes to your pattern, hold it up to you in front of a mirror and really look - is it long enough?  Does it look right?  You can get a lot of information about what the pattern needs to fit you, just by holding it up to yourself and looking.  Remember to factor in seam allowance,  which on the Bebe dress is 1/2.   I  am extending the bodice down one inch as when I pinned the pattern to me, it fell about an inch short. By adding on an inch, it makes sure that the bodice sits just under my bust, at the bra line.

 This is the bodice with a full bust adjustment.  I drew a line one inch down from the bottom edge to add an inch.  


Here is the back bodice piece and front bodice piece, ready to go to sew up!

Next post: Sewing the muslin!