Sunday, September 25, 2011

Tim and Dani's Kitchen Valances

 Last night I delivered  and installed kitchen valances for Dani & Tim , a couple in Chesapeake. They are so nice and so fun! I had a wonderful time drilling in their kitchen :) !


Dani found my website a year ago. She bookmarked me and saved my info until she found the fabric she wanted. She finally saw the right fabric on a tv show, and amazingly was able to track it down!
She had  also seen the valances I did for Doug and Diane's kitchen, last winter  and really liked those.  I visited the house, measured, got an idea of what she wanted and  I then went out and found co-ordinating fabrics for the pleats and piping.
Here is  a close-up of the fabric:


Isn't it gorgeous? I just love it!


Here is the Kitchen before:


I just love the plates. I was a tiny bit sorry to have to move them as they are just lovely.
I think Dani is going to hang them on one of the other walls in the  kitchen.


And after ! :)


Changes to the pattern:

  •  I widened the swag pattern from it's original size. I also shortened it a bit.  Tim and Dani love the light and didn't want to cover too much of the windows so  it cut it to @15 inches long at the longest part. 
  • I also added a bit more "swoop" to the top of the pattern. Tim  (who claims to not know anything about window treatments or fabrics and whom I do not believe one bit :) ) thought that they would look nicer with a bit more dip in the top. So I took it down about 1.5 inches from the original pattern. I know that doesn't  sound like much but when it is in a curve, it makes  a big difference. I made a pattern template where I altered the 'swoop" to be about 3 inches form the original and it looked distorted.  So I halved that and 1.5 was perfect.
  • Side returns are 5.5 instead of 3.5 so I just widened that pattern piece. 
Pieces are cut out and ready to be assembled.  In the background you can see my assistant, Sophie.
She usually lays under the table while I work , supervising. 


I cut the interlining as one piece. The pattern calls for cutting the interlining  like the face- as separate pieces then sewing them together.  That method is fine, but the problem is, there are then three seams in each pleat area.  In the past two of these that I have made, I could not get a nice, perfectly crisp pleat   like I wanted.
This is the swag fabric & pleat fabric sewn together. 
Check out the awesome stripe that I found to go in the  pleats! I had found a few choices and when I brought them over to show to Tim and Dani, Tim chose this stripe. ( Again,  I just don't believe him when he says he doesn't know about fabric ! :) )   The fabric in the pleats is not  seen really, it can be any fabric that just compliments the front.

 I cut and sewed the face fabric, the floral and stripe and then pressed it. Then I used that as my template to cute the interlining as one piece.  This made much less bulk in the pleats areas and I was able to get a nice crisp pleat that laid flat.

Here is the face fabric being used as a pattern for the interlining. This reduces bulk in the pleats! :)


For next time:

I am going to cut the back lining piece  in the same was as I did the interlining, by using the face fabric as a pattern piece. I have a client, Regina, who is looking at the pattern in a beautiful black and white print.  The pattern calls for the pleats to be lining in the back with the same fabric that is in the pleats on the front.  With a black and white face fabric, a white lining would blend in nicely in the back.  This would also cut the bulk in the pleats down to almost nothing ensuring  that the pleats lie the way they are supposed to with nice crisp lines.  In a multi colored fabric, I do think the back of the pleats would need to match the front as they are seen a tiny bit.


The Knobs and Posts: 
are from Pate Meadows. I chose the 5.5 inch projection posts for this to accommodate the window moulding and the pleats behind the valance.  In a perfect world, you could order these to your exact  size- like I really would have preferred a 4.5 inch projection from the wall.  But we live in an imperfect world ( "Screws just fall out all the time, the world is an imperfect place"... Quick!!! name that movie quote!.......................ok, I will give it to you- Breakfast Club.)   so I  had to choose between  two sizes.  The posts come in 3.5 and 5.5. I felt 3.5 was just to small for this room. So 5.5 it was.

The knobs are so so so pretty.


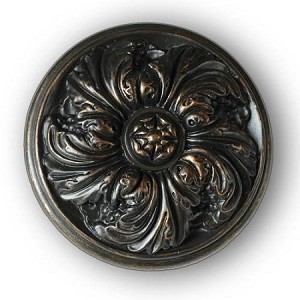
Close-up of the knob. 

Knobs are mounted 2 inches out  from and 5 inches above the moulding on the side windows. Center windows are 3  inches out from and 5 inches above.  The center windows are 1 inch more because if I added those 2 inches, all the swags across all three windows would be the same size.
 I did not use the plastic anchors included with the posts. I also did not use the amazing drywall anchors that I have been using. I didn't use any anchors at all on these because those posts are actually wood and very light. These valances weigh very little. I put one post in and tested it out and it was solid and secure.  As long as no one is playing Tarzan on them, they will be more than fine. They will stay put until they decide to take them down, which I hope is many years away. :)

The door:


The door needed something too. If we had done the windows and not the door, it would have looked unfinished.   I do not think the Delaine valance would well work on doors, so  we did a valance mounted on a board (1 x 2.5 ). It is gathered in the back with button thread at  measured intervals.   Welt cord at the top and bottom.  It also has a depth of 15 inches. The curved bottom edge matches the curved bottom edge of the window valances, so it ties them together.


Here is both the door and the windows. I will tell you, because  I am sure Dani would want me to  tell you, that the ironing board does not live in their kitchen. :)  It is only there because I used  it to give the valances a nice hot press  seconds before hanging  them up.  It makes a big difference in hanging this particular valance. I lay them flat to deliver them but no matter how careful I am, they still get a bit wrinkly en route.  The swags must be perfectly smooth to look nice.


Materials used:
Dani found the gorgeous floral print online. The stripe in the pleats and the fabric covering the welt cording are from Artee fabrics, in Virginia Beach. Cotton interlining and lining are from Rowley. Post and knobs are Pate Meadows. Pattern is the Delaine Valance, Pate Meadows.


Colette's New Bedset


I delivered Colette's new bed set today!   I created the 2 large Euro shams in the back, the three pillows, the bedskirt and the accent blanket. 


  The solid colored bedding and blankets were purchased. 


The thing I call an accent blanket on the end of the bed is really cute.  The edges are scalloped which  echos the edges on the solid blankets.  I don't know what they are called in the real world - you see them in hotels and in magazines. My husband sees no point in them- it is not really a blanket , it does not keep you warm- What is the point? Why not just have a real blanket  instead of a pretend one?  
Beause they are  relatively inexpensive as they use little fabric, and it is  a great way to add a little more pizzaz to a room . And because they are pretty!   And just because... does everything in the world need a logical reason for existence?  :) 


I love the pillows. Pillows are also a fun, inexpensive way to add  personality to a room.

White cording  was added to the edge of this envelope pillow. 
I remembered to take close-up pictures of the pillows right before I delivered them - those are my new Living Room panels in the background :)


Colette is not a frilly type of girl, so I suggested  pleats instead of ruffles on the  striped pillow. She liked that idea.   (I tried to use my ruffler foot to do the pleats but  the ruffler foot is  pain  in my beheiny as it only cooperates with me about once a year. So I pleated by hand- it really didn't take  long.)  


I am on a roll lately, rocking out the custom work.  (It's amazing how much I can accomplish now that my darling daughter is back in school. :) ) 

Next up are panels for Colette's window. She has a beautiful large window in her room. I am going to create  panels with tiny pinch pleats at the top out of white twill , with buttons at the bottom of the pleats. They will be banded on the sides in the floral  (so that the white panels don't show the use  from her opening them and closing them each day. ) 

Tuesday, September 13, 2011

Getting ready for Halloween

Eden wants to be a vampire for Halloween this year. She says she does "not want to be a modern vampire, I want to be a classic vampire". Ok. A classic vampire it is. She would like a cape, black on the outside and red on the inside. She wants a short, fluffy dress. She liked last year's dress but the long dress part got in the way while trick or treating. She wants lots of ruffles and pace because classic vampires have "that old timey look" .


 Sooooooo here is our plan:

 Cape:

 I searched in the pattern box and found this pattern. We are going to make a short version of Cape B, black satin on the outside, red satin on the inside, as requested.


Dress:

I used this pattern as my base. I love this pattern! It is so pretty- I want  version 2 on the left for me! I want it in black and white check, with ruffles - just like the drawing! 

I tissue fit it on Eden and it seemed to fit well.  It was a tad bit big but not too bad. (I grabbed this pattern image off of a google search- scanning in my pattern would require effort that I don't have)  The size I used was a 10T chest  30.  Eden is a 26 so I figured I could take it in in the back and on the sides if it was way too big.

I made my muslin from a pink fabric that Eden picked out a couple of months back. I get tired of sewing on real muslin sometimes...it's so...blah.  Plus, if the test works, Eden can actually wear it. Making muslins are essential but sometimes I get frustrated at spending so much time on a non-wearable item. 

Here is the wearable test muslin!


It looks nothing like the pattern does it?  :)  I changed it all around. I made the pattern just like it is designed at first, though I ignored  the front darts (because Eden is...let's just say it- darts are for curves and my little darlin' doesn't have any yet ) and  it was soooooooooo big.  I removed the neck facing and then added tucks down the front center to take in the fabric. That took the front in 4 inches. The dress was very low cut so I added a neckline  about 2 inches wide. That brought the neck up to a much more comfortable level. Eden wants puffy sleeves so I just made the sleeves wider when I cut them out and gathered the new extra material at the top of the sleeve. I added elastic inside a casing at the bottom edge of the sleeve. That helps increase the puffiness.


 The back is pretty much exactly like the pattern. I took in about 4 inches on the back seam too.   I used an invisible zipper. Regular old double fold hem at the bottom.


I think she likes her new dress. 


I wish I had some of the socks she had as a baby- the white ones with super ruffles on the cuff. That would be adorable . She needs some saddle shoes too!

On the one for halloween , we will just be using the top of the dress. Eden likes the dress  but for her costume, she wants a wider twirly skirt  with a ruffled crinoline underneath. I did try to cut this dress with more skirt but it seemed to just fold up at the sides of the dress- it wasn't twirly. So I moved the side seams back in to about their original position. There will be no yoke-collar-neckline-raising thing on the halloween version.  I will cut the neckline much higher and just use creating a facing. I will also take out 4 inches form the front of the pattern, and 4 inches from the back. Though we both like the tucks, she doesn't think her costume needs them. 
She would like the dress to be red. I am pushing for a red and white crinoline  and white tights and black shiny shoes. I think that would be so cute!  Vampire teeth and  white make-up  and we are done! :)

The skirt will be a circle skirt using the circle skirt pattern from this book:


I love this book! I have made tons of skirts from this book and they turn out perfect every time. 

Off to sew!