Showing posts with label pate meadows. Show all posts

Sunday, October 28, 2012

Doug & Diane's Dining & Sitting Room Valances

Hello!
     It has been a while since I posted.  I have been pretty busy with lessons, halloween preparation, a kitchen redo and just life in general. :)
    I have also been working on valances for  Doug & Diane.  This time I was working on their dining room and  joining sitting room.   I have now done  the windows in 5 rooms on their house :)  They are so fun and so sweet, I love going to visit them!
   For the SR and DR they wanted valances.  We chose  the Catherine valance from Pate Meadows Patterns.  I love the updated swag and jabots of this pattern.   It is classic and tailored but still has a modern quality to it.


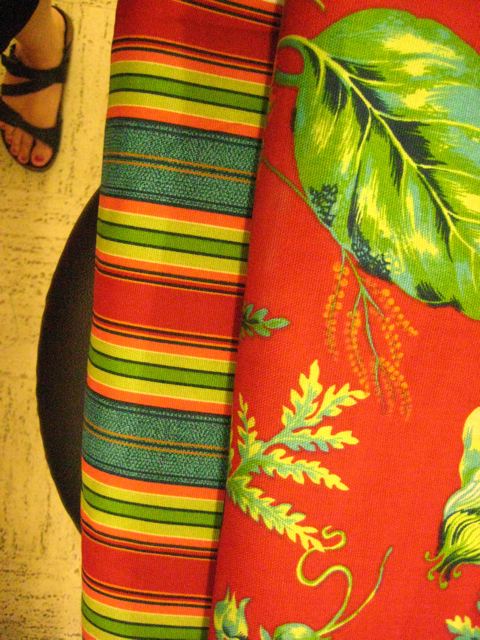
      Diane wanted a fabric that  evoked Williamsburg.  Doug didn't want anything that be  considered country.    They both  wanted color POP!  We have used red in each room of the house and so I made sure the Fabrics that I looked at  had dominant reds in them .
           When I saw this fabric I knew it was the one.  I still had some other for them to choose from but this one is just perfect. I love the large bold flowers and the blue vines.

     For finishing  the edges, Doug didn't want anything with an tassels or funny business on it.  I did still  take a couple of trims to show them ,  even though I knew he wasn't going to go for it, because I had to try! I have seen versions of this valance that had a tassel trim on the bottom edge and they were gorgeous.   He picked a  beautiful  red twist cording  from the trims I had brought  to choose from.
    The contrast fabric on the inside of the jabots and the horns  is a smooth creamy satin. It matches the walls almost exactly  and peeks out  of the bottom folds of the jabots.

The valance is very straightforward to make.  After making a number of Pate Meadows designs, I have their method of construction down pat.  The sewing part of the valance did not take  too long, however the altering of the pattern and cutting it all out took fooooorrrreeevvveeeer.
    The swag valance pattern piece unaltered is about 40-42ish inches long.  The fabric repeat of the large flower was 36 inches. I had take the inches out of the pattern piece so that I could allot 1 yard for each swag. The altering took a while because I had to evenly distribute what I took out. That took all my brain cells!   I then had to alter the jabot and horn pattern  piece as well.
Then I had to cut them out. My husband called  when I had the scissors in hand about to make the first cut. I was so relieved for an excuse to stall in cutting!

     Once I cut the first swag,  I used it to cut the other pieces. that way they would all be the same.  Then I cut interlining pieces , lining pieces and contrast pieces. Yes, a lot of cutting! Then I stacked all the pieces up on one end of the dining table  and there they stayed as I worked on them for a month. I couldn't store them in the sewing room as I have had lessons out there and the spare room was full of kitchen cabinet doors  being re-stained.  My husband did eventually ask, hey are these ever going to be done and off the table? :) 

       This pattern is a yardage eater!!!  Each swag is a little over a yard and each jabot is a yard.  I had to cut out of the center of the fabric, making it impossible to salvage any  leftover fabric to use for anything else.  It hurt me  a little to throw the cuttings away. This fabric is gorgeous!


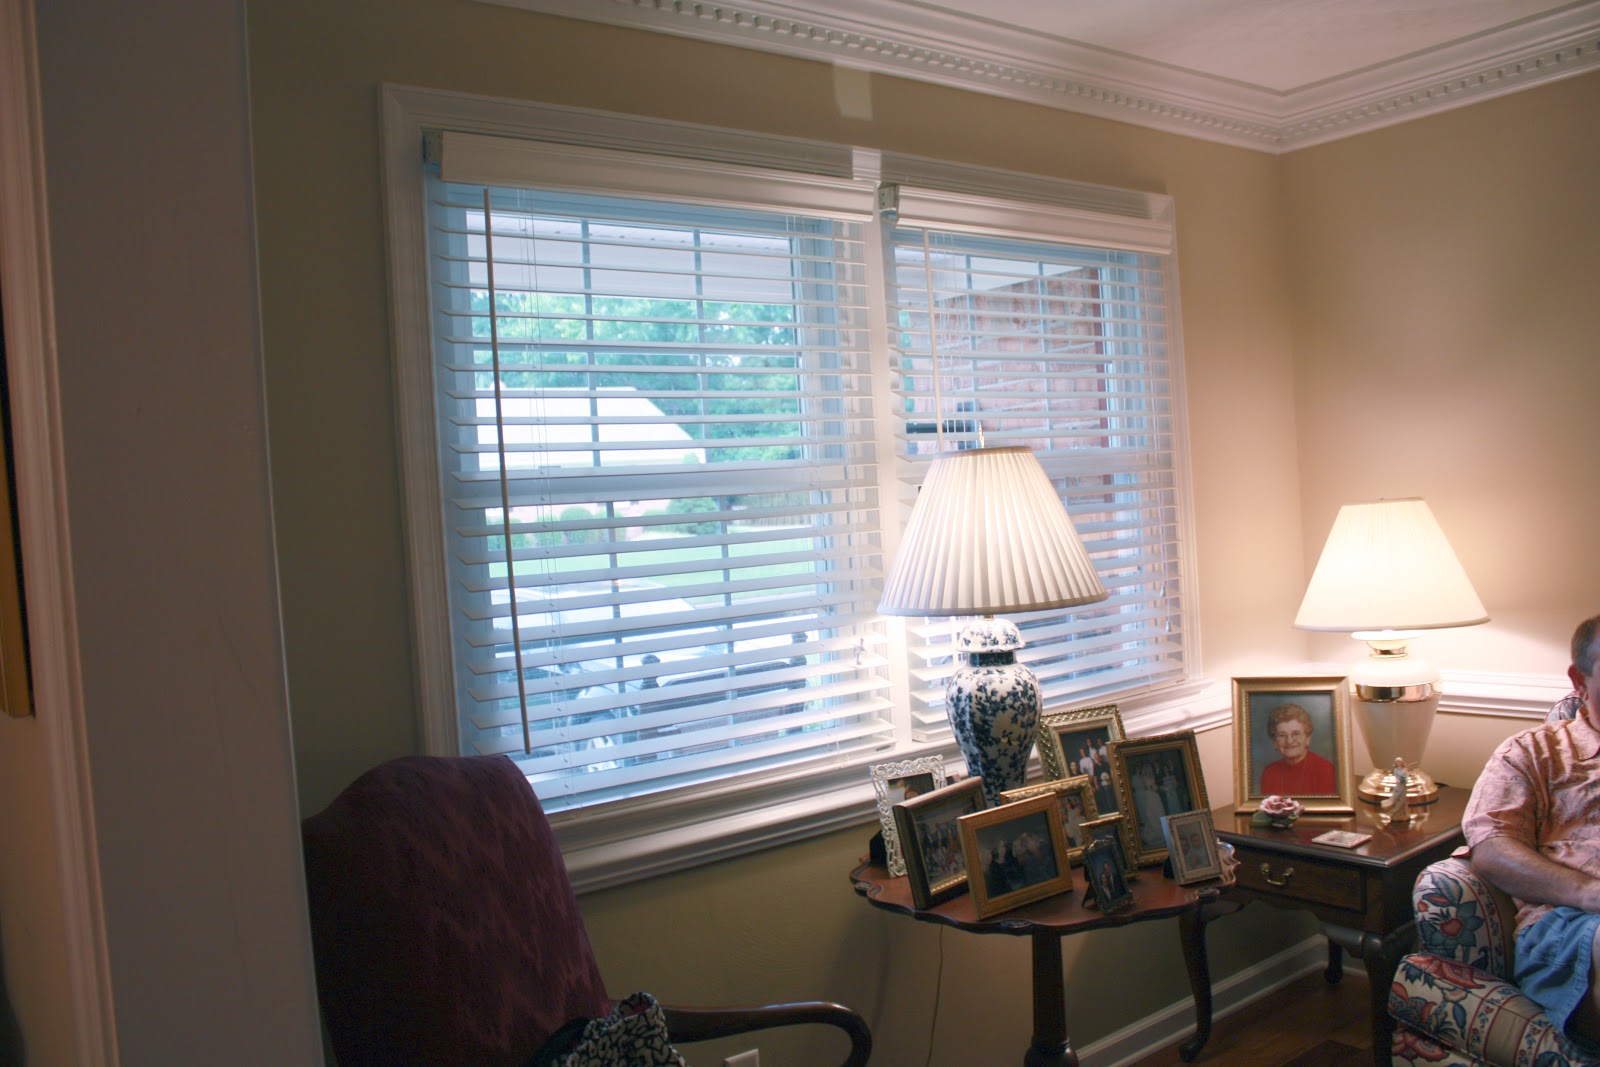
This is the dining room valance. It is 88 inches long, 
The dining room before .

       I love the red cording on the edges of the valance. It frames it gorgeously. I will confess, It is not one of my favorite things to sew. It is just thicker and therefore isn't super flexible or co-operative.   Most of the edges in this valance are pretty straight so it wasn't too bad.
I bought out most of the red twist cord in Hampton Roads because I needed large continuous pieces.  I had to go to a couple of stores and buy all they had. And then  wait till they got new  stock in to get more :).


 For the side jabots, the pattern has you make wooden pieces that attach onto the wall  under the rod bracket and then the  jabot return attaches to the wood.  I made the wood pieces but ended up not using them. 
I hooked a ring onto the bracket and attached the return of the jabot to that. I liked it better than  the wood. 


Dining room 
 The rods are solid wood and  lovely. I wanted to use wood rods as   Doug & Diane have lots of gorgeous wood pieces in these room.  The wood rod  ties it all together.
The sitting room  
The sitting room before. 

The Fabric:
The  red and blue is from Artee's in Virginia Beach. I used to love going there but they are under new management and I have to say, the guy running it now has kinda turned me off to the store.  I was confused by the lack of customer service and put off the the holier than thou  attitude of the manager. He was really rude to me directly  and I find that I do not want to repeat the experience. It is a shame, I used to really love going there.
The contrast cream satin  on the inside of the jabots and horns is from good ole Blaneys in Norfolk.  They have been there since the dawn of time and will probably be there till the end of time because hey have good customer service.  I have used this satin often as it is a dream to work with and comes in lots of yummy colors.
The linings are  flannel  interlining and roclon rain no stain ivory cotton.


The hardware:
is from Lowe's.  In the window treatment  hardware aisle, in the first section is a collection of Allan & Roth mix and match wood rods and finials. They are great quality and a  great price for decorator rods.

The pattern is:
Catherine valance from Pate Meadows Patterns.  All Pate meadows patterns are awesome.

Sunday, September 25, 2011

Tim and Dani's Kitchen Valances

 Last night I delivered  and installed kitchen valances for Dani & Tim , a couple in Chesapeake. They are so nice and so fun! I had a wonderful time drilling in their kitchen :) !


Dani found my website a year ago. She bookmarked me and saved my info until she found the fabric she wanted. She finally saw the right fabric on a tv show, and amazingly was able to track it down!
She had  also seen the valances I did for Doug and Diane's kitchen, last winter  and really liked those.  I visited the house, measured, got an idea of what she wanted and  I then went out and found co-ordinating fabrics for the pleats and piping.
Here is  a close-up of the fabric:


Isn't it gorgeous? I just love it!


Here is the Kitchen before:


I just love the plates. I was a tiny bit sorry to have to move them as they are just lovely.
I think Dani is going to hang them on one of the other walls in the  kitchen.


And after ! :)


Changes to the pattern:

  •  I widened the swag pattern from it's original size. I also shortened it a bit.  Tim and Dani love the light and didn't want to cover too much of the windows so  it cut it to @15 inches long at the longest part. 
  • I also added a bit more "swoop" to the top of the pattern. Tim  (who claims to not know anything about window treatments or fabrics and whom I do not believe one bit :) ) thought that they would look nicer with a bit more dip in the top. So I took it down about 1.5 inches from the original pattern. I know that doesn't  sound like much but when it is in a curve, it makes  a big difference. I made a pattern template where I altered the 'swoop" to be about 3 inches form the original and it looked distorted.  So I halved that and 1.5 was perfect.
  • Side returns are 5.5 instead of 3.5 so I just widened that pattern piece. 
Pieces are cut out and ready to be assembled.  In the background you can see my assistant, Sophie.
She usually lays under the table while I work , supervising. 


I cut the interlining as one piece. The pattern calls for cutting the interlining  like the face- as separate pieces then sewing them together.  That method is fine, but the problem is, there are then three seams in each pleat area.  In the past two of these that I have made, I could not get a nice, perfectly crisp pleat   like I wanted.
This is the swag fabric & pleat fabric sewn together. 
Check out the awesome stripe that I found to go in the  pleats! I had found a few choices and when I brought them over to show to Tim and Dani, Tim chose this stripe. ( Again,  I just don't believe him when he says he doesn't know about fabric ! :) )   The fabric in the pleats is not  seen really, it can be any fabric that just compliments the front.

 I cut and sewed the face fabric, the floral and stripe and then pressed it. Then I used that as my template to cute the interlining as one piece.  This made much less bulk in the pleats areas and I was able to get a nice crisp pleat that laid flat.

Here is the face fabric being used as a pattern for the interlining. This reduces bulk in the pleats! :)


For next time:

I am going to cut the back lining piece  in the same was as I did the interlining, by using the face fabric as a pattern piece. I have a client, Regina, who is looking at the pattern in a beautiful black and white print.  The pattern calls for the pleats to be lining in the back with the same fabric that is in the pleats on the front.  With a black and white face fabric, a white lining would blend in nicely in the back.  This would also cut the bulk in the pleats down to almost nothing ensuring  that the pleats lie the way they are supposed to with nice crisp lines.  In a multi colored fabric, I do think the back of the pleats would need to match the front as they are seen a tiny bit.


The Knobs and Posts: 
are from Pate Meadows. I chose the 5.5 inch projection posts for this to accommodate the window moulding and the pleats behind the valance.  In a perfect world, you could order these to your exact  size- like I really would have preferred a 4.5 inch projection from the wall.  But we live in an imperfect world ( "Screws just fall out all the time, the world is an imperfect place"... Quick!!! name that movie quote!.......................ok, I will give it to you- Breakfast Club.)   so I  had to choose between  two sizes.  The posts come in 3.5 and 5.5. I felt 3.5 was just to small for this room. So 5.5 it was.

The knobs are so so so pretty.


Close-up of the knob. 

Knobs are mounted 2 inches out  from and 5 inches above the moulding on the side windows. Center windows are 3  inches out from and 5 inches above.  The center windows are 1 inch more because if I added those 2 inches, all the swags across all three windows would be the same size.
 I did not use the plastic anchors included with the posts. I also did not use the amazing drywall anchors that I have been using. I didn't use any anchors at all on these because those posts are actually wood and very light. These valances weigh very little. I put one post in and tested it out and it was solid and secure.  As long as no one is playing Tarzan on them, they will be more than fine. They will stay put until they decide to take them down, which I hope is many years away. :)

The door:


The door needed something too. If we had done the windows and not the door, it would have looked unfinished.   I do not think the Delaine valance would well work on doors, so  we did a valance mounted on a board (1 x 2.5 ). It is gathered in the back with button thread at  measured intervals.   Welt cord at the top and bottom.  It also has a depth of 15 inches. The curved bottom edge matches the curved bottom edge of the window valances, so it ties them together.


Here is both the door and the windows. I will tell you, because  I am sure Dani would want me to  tell you, that the ironing board does not live in their kitchen. :)  It is only there because I used  it to give the valances a nice hot press  seconds before hanging  them up.  It makes a big difference in hanging this particular valance. I lay them flat to deliver them but no matter how careful I am, they still get a bit wrinkly en route.  The swags must be perfectly smooth to look nice.


Materials used:
Dani found the gorgeous floral print online. The stripe in the pleats and the fabric covering the welt cording are from Artee fabrics, in Virginia Beach. Cotton interlining and lining are from Rowley. Post and knobs are Pate Meadows. Pattern is the Delaine Valance, Pate Meadows.


Tuesday, December 28, 2010

Doug & Diane's Kitchen Valances


Happy New Year!!!!! Woohooo!!! Christmas is over!!!! Please do not think I am a scrooge or a humbug- I am as gung ho happy about Christmas as you can get. But this year I was really ready for the peace and quiet of January.

Right before Christmas I finished up with Doug & Diane's valances for their kitchen and laundry room. They wanted matching valances for a bay window in the kitchen, a window over the sink and one for the laundry room, which is right next to the kitchen.
Doug & Diane are the cutest couple! They are two of the nicest people on the planet. They are so fun to work with as not only are they nice, but they have really great ideas about what to put in their house. And speaking of their house- it is beautiful! When I was going to install these valances, it was a couple of days before Christmas. As I was driving to their house, I said to my self "Self, I bet their house is the most beautifully decorated on their street" . And I was right! :)


Here is the Bay Window we were covering.


And here is the sink window:


When we started to talk about the style for the kitchen, I asked them what they liked. Doug likes tailored. He doesn't want any fluffy, frilly business. Diane liked the idea of a handkerchief valance: she had mentioned one in a friends home that she liked. The continuous style appealed to her. Doug did not care for the casual look that those can have. I combined their likes/dislikes and realized I had to find a valance pattern that was tailored not frilly, continual on piece design, could incorporate two fabrics, and be able to be altered to accomadate two smaller windows over the sink and in the laundry room, and also look great over the main bay window. No problem! And here was the kicker: install in less than one inch of space.
Look at the pictures above of the bay window and sink window- I had an inch above and an inch to each side. That was it. Yep. 1 inch.

I looked through my patterns & books. Nothin'. I looked on line. Nothin'. There were a lot of patterns that fit a few of the criteria but not all. And then I went to the Pate Meadows Window Treatment pattern website. Jackpot!


I love Pate Meadows patterns. They are wonderful because:
  • They include very clear directions with drawings and detailed descriptions.
  • They are printed on heavy white paper. This paper is much easier to work with than commercial tissue paper, especially with home decor fabrics.
  • They are easily alterable for different size windows.
  • Customer service is awesome! They ship fast and have great communication. Also, I lost my install sheet at some point for the Erin valance . I couldn't remember how long the side bar pieces needed to be cut for the supporting frame . I called them and they were so nice as to read that part of the pattern to me right over the phone!
  • They turn out freakin' gorgeous every time. And I mean absolutely freakin' gorgeous.
Drawbacks:
  • They are not cheap. Average price: $29.95. Yea. For a paper pattern. I am the girl who won't purchase commercial patterns unless they are on sale for .99. But I will buy these, they are that good. Spend money where it is worth it- I always say. And Pate Meadows patterns are worth it.
  • They always seem to overshoot on the fabric estimate. I now know to fully figure out my own yardage - I don't go by their estimate. I draw out exactly how I am going to lay out the pattern pieces on the fabric and figure out my yardage that way. Yes, some extra is good: I don't do a project without some sort of extra factored in. But each of the 4 patterns I have made so far had much higher fabric estimates in the pattern than it turned out I needed. That is my one and only issue with the patterns.

We chose the Delaine pattern. It is a wonderful design that incorporates two or more fabrics, has a welt corded edge (Doug likes welt cording :) ) , can install in next to no space and is just really cute!
We had found the right fabric by accident. In my search for the fabrics for their den, this fabric was one of our options. It didn't work for their den, but it was perfect for the kitchen.

This is the Stripe:


When searching for a fabric it is sometimes easier to take pictures, rather than write down the name , price and colors of each option. Plus, some fabric stores are chintzy with the samples so taking a pictures gets me a much better idea of the pattern. This is the end of the bolt for the stripe. I found it at Hancock's for $9.99 a yard.


I found our main floral fabric at Blaney's in Norfolk. Way out on Military Highway past Janaf, past the airport = out in the city version of the boonies. They have great prices and are very nice. I left my favorite sweater there in early November. When I went back in they had it right there for me, knowing I would eventually be back in :) I was sitting in front of their counter, checking out thinking that the sweater on the chair looked very much like mine. The one I couldn't find.


The colors on the fabric matched the colors in the pretty artwork that Doug & Diane have in the kitchen. We all liked the red background and the fun, painterly flowers in bold colors. And that it was $14.98 a yard. That's not bad.
I almost had a heart attack when I went in to buy the fabric. It had been about a month since I had gotten the sample. I went to where the fabric used to be located and ti wasn't there. I searched the store and couldn't find it. I believe I was slightly hyperventalating. When I asked about it, they helped me search it out- it was hidden in a corner behind a ton of other bolts and down to the last 6 yards on the bolt. Luckily, I only needed 5.5! Whew!!

The stripe that I found at Hancock's did have a matching floral that went with it but it was very tropical and that is not the look we wanted in the kitchen. I must have been researching this fabric in the summer because you can see my foot in the left upper corner! I think I took these pictures when I was finding fabrics for their den... I had liked the stripe for their home from the beginning :)


To make these valances first I made cording! I learned a most wonderful way to make cording from Mary Parker, slipcover maker extraordinaire. Out of Ptown, Va. You make a fabric ' tube', cut around it and you have one long perfect continuous strip to cover the welt cording. It takes half the time of cutting out each strip.
Here I am cutting it out. I took pictures while I was creating this cording to put into a lesson for my students about welt cording.

You end up with one incredibly long beautiful strip of fabric!

Then I cut out all of the pieces for the valances. Each swag and pleat section were seperate pieces. So I was cutting for hours, it seemed like. Each valance has a face fabric, a back lining and a flannel interlining.
Here is my dining table with the pleat fabric laid out on it ready to cut out the pleaat sections.


This is the face fabric of the valance sewn together. Look in the back! There is my Christmas tree! :) In this post we have gone from a shot of my sandled foot in a fabric store in summer to my Christmas tree. I guess we weren't in a hurry on these :)


I then applied the cording to the face fabric
  • Here is the greatest tip you will ever get about cording in your life: sew it on with the CORDING ON THE BOTTOM and the FABRIC on the top. The welt cording should be against the feed dogs. This ensures that the fabric does not pucker.


In this photo I have finished sewing on the cording and have sewn all three layers; the lining , interlining and face fabric, together. I then turned it inside out, slip stitched the end closed, pressed and sewed the pleats in place. Pressing did take a while as you really have to press the living sunshine out of the fabric to get it to stay.


Once I got all three valances finished I needed to put my idea of how to hang them into motion. Pate Meadows uses really neat adapters that screw right into the wall . They extend 3.5 inches from the wall. The valances have loops sewn into the pleats that the valance hangs from on the posts.
We couldn't use them. The base of adapter post is about 3 inches across. We only had an inch of space in which to install. Again thank you o inconsiderate home builders who didn't think ahead that these lovely homeowners would eventually want to hang window treatments in their home.
So my idea was to cut dowels into 3.5 inch pieces and paint them to match their moulding (Luckily we just moved and I still have a can of ultra super bright white gloss paint!) Then we would screw a decorative knob onto one end and the other end straight into the wall.


This is my dowel painting contraption that I made. I took a pice of scrap wood and hammered nails into it, leaving about an inch out of the wood. The dowels (cut and drilled by my sweet husband) could then stand up on their own . This made it so easy to paint them.


Here is a side view of the post adapters from the Pate Meadows website. They are really nice, I was upset I couldn't use them. I do think the dowels turned out fantastic as they blend right into the molding so you don't really see them at all.
Double sided screw. Also called a splicer screw. Use a #8 size for drawer knobs.

Here is the final valance! The posts that the valances hang on are installed in between the windows in that one inch of space and on teh molding itself.

The bay window:
See how the fabric matches thier paintings on the left side? perfect!
The bay window and the sink window. While Doug and I were installing, Diane was searching for and found her mothers pound cake recipe. I cut it out of the photo but the counter was piled with butter and cream cheese and all things yummy to make pound cake:)
Here is an up close view of the front of the bay window valance.
The laundry room window. I suggested that they paint one wall of the laundry room red. Wouldn't that look really cool?
The sink window. I love the Santa's on the window!
Here is the side of the bay window valance.