Nina is 11 years old and has been taking lessons with me for about a year now. When she first started she was kinda quiet. She was very interested in sewing, I could tell, but I would have to ask a lot of questions to get her to say what she liked and didn't like. Then she came out of her shell a little and she started to talk a little bit about her ideas and ask questions. Along the way we did projects geared toward learning basic sewing skills like planning the project, cutting out pattern pieces, working the machine and sewing a nice straight seam. With each project she would get a little more confident with the machine and her sewing ability.
I use a really cute book to get ideas for projects for kids. I usually end up altering the instructions a bit to suit the individual child.
 Nina made a cat/fox from the book. The project was a cat or a dog that used many different pieces. She decided to make a two tailed cat/fox. Nina loves animals so this project was really fun for her as she got to combine animals! It turned out adorable! It gave her practice cutting and sewing small pieces. We did not use the method in the book that uses wax paper as the pattern pieces- we just photocopied the book page and cut them out. She had to go slow and stitch carefully around the small curved edges. This project was great for teaching patience and carefulness :) We used some hand sewing in sewing on buttons. Then she did the cutest thing! She glued cotton balls onto the ears and tails to make soft fluffy tails.
 Nina made a cat/fox from the book. The project was a cat or a dog that used many different pieces. She decided to make a two tailed cat/fox. Nina loves animals so this project was really fun for her as she got to combine animals! It turned out adorable! It gave her practice cutting and sewing small pieces. We did not use the method in the book that uses wax paper as the pattern pieces- we just photocopied the book page and cut them out. She had to go slow and stitch carefully around the small curved edges. This project was great for teaching patience and carefulness :) We used some hand sewing in sewing on buttons. Then she did the cutest thing! She glued cotton balls onto the ears and tails to make soft fluffy tails.
 Here it is ! :)


Now lessons are hoppin' as when I present our next project, she is just bursting with ideas and ways to make it her own.
Here she is with her first purse that she made. She chose the fabric as it has cute dogs on it. It is fully lined and has a rick rack trim on the front:
For Christmas presents we made tissue holders. We used only hand sewing with this as I am still trying to convince them that hand sewing is necessary. For some reason the young ones think that sewing means just using the machine and only the machine. We also practiced sewing on buttons, tying knots and cutting using the pinking shears. The pinking sheers are hard for the young ones to hold onto sometimes. I am trying to find a smaller pair but so far haven't seen any.
 She made this one for her grandmother. I forget why she chose the green fabric and ladybug theme but she had a really cute reason. These tissue holders fit a travel size tissue pack. They are made of felt, which is about .25 a sheet. I like to buy it on sale at Joann's for .19. The felt is very forgiving to young fingers trying to work a hand needle. Each of the Saturday Girls made this project with me in lesson then took home the instructions so that they could make some on their own to give as presents for Christmas.
For Valentines day I had planned a project that we could do in an hour. A year ago, this would have taken us two lessons. Now when I talk about creating a pattern piece, sewing it with the seams showing, using pinking sheers, stuffing, etc. she understands what I am talking about and we can get right to the fun.
I had to project idea for a Valentine's pin- we would cut felt shapes and stack them together, sew them , add buttons or whatever decoration she wanted, then stuff it and glue a pin onto the back. She loved the idea but wanted to change it. She wanted to make a Valentine's lollipop pin for her dad. I think that is just fantastic! We are at the point where she understands the idea I have for the project, but redesigns it. (To me this also means I am doing my job :) She gets it! Hooray!!)
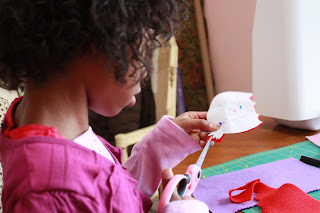
Here she is after creating the pattern piece for the lollipop. I have discovered that people learn the intricacies of patterns easier if they start out making them. So we drew out the lollipop and heart on paper. She also thought that it would be cute if the lollipop already had a bite taken out of it.

She then pinned the pattern pieces down and cut them out of red felt.
 She was very good about keeping her fingers back and carefully turning the felt piece to stitch around the curves of the heart. Curves are not easy to sew, especially small ones, like the heart. She took it slow and did an absolutely beautiful job. And see how her fingers are back outside of the throat plate? That is exactly how they should be! :) :)
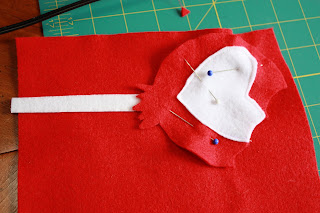
We use a piece of Peltex for the lollipop stick. Peltex is very thick super sturdy iron on interfacing. I use it for the bottom of purses, to make christmas ornaments and to back decorated pins. Nina then pinned it to the backing and sewed around the edge of the lollipop.
 Here is the finished lollipop.
We glued a pin onto the back.

And here is one last shot of the lollipop. She wanted one photo to have the hail in it. As we were finishing up the lollipop it started to hail. It was crazy! Luckily it wasn't the really big car denting kind of hail. Just little granola sized hail.

Nina also wanted the lollipop to say" lollipops are like love" But I told her that she should draw her dad a card and put that in it. There was just no room on our lollipop to write" lollipops are like love" :) :)
Happy Valentines Day everyone!
