Sunday, June 17, 2012

The Mae Dress

Simplicity 5915
This is my new favorite dress.

  I love this dress!!  I made it  a couple of weeks ago but am only getting around to finishing this post about it.   I love this pattern! It is from 1965.  I used it to make Eden's Halloween costume  last year and   this dress :  The Pink Peace Dress.


 I have been wanting to make one for myself  for a while. I chose the view on the right,  the white one. But in black of course! I  do love the gal on the left, and I intend to make one exactly like hers eventually. I love the large gingham check and  it is hard to see in this photo but she is wearing fishnets and pointy toe shoes. So cute!  I need her whole outfit!!!

 I got this pattern in Tennessee last year on spring break when we went out to my dad's farm to visit.   So the pattern was only in my possession for a year before I got around to making it! That's not bad!  I bought it in Fayetteville, on the square in one of the antique shops.  The pattern  I found is a 10T meaning it was for teens.  The size is a 30 bust. Now, I can't recall in  my life being a 30 bust. My 9 year old is a 28 inch chest so I think this pattern was probably meant for what, 12 year olds? Yea, folks were skinnier then, there wasn't any Ben & Jerrys and ranch dressing wasn't invented yet. But still, wow. Small.
I graded the pattern up, meaning I altered  from a size 10teen bust 30 up to my size. I am not going to publicly tell you my exact inches but I am  waaaaaaayyyyyy above a 30 bust. Yes, I made a muslin. Here I am in all of my muslin glory looking mighty sexy-
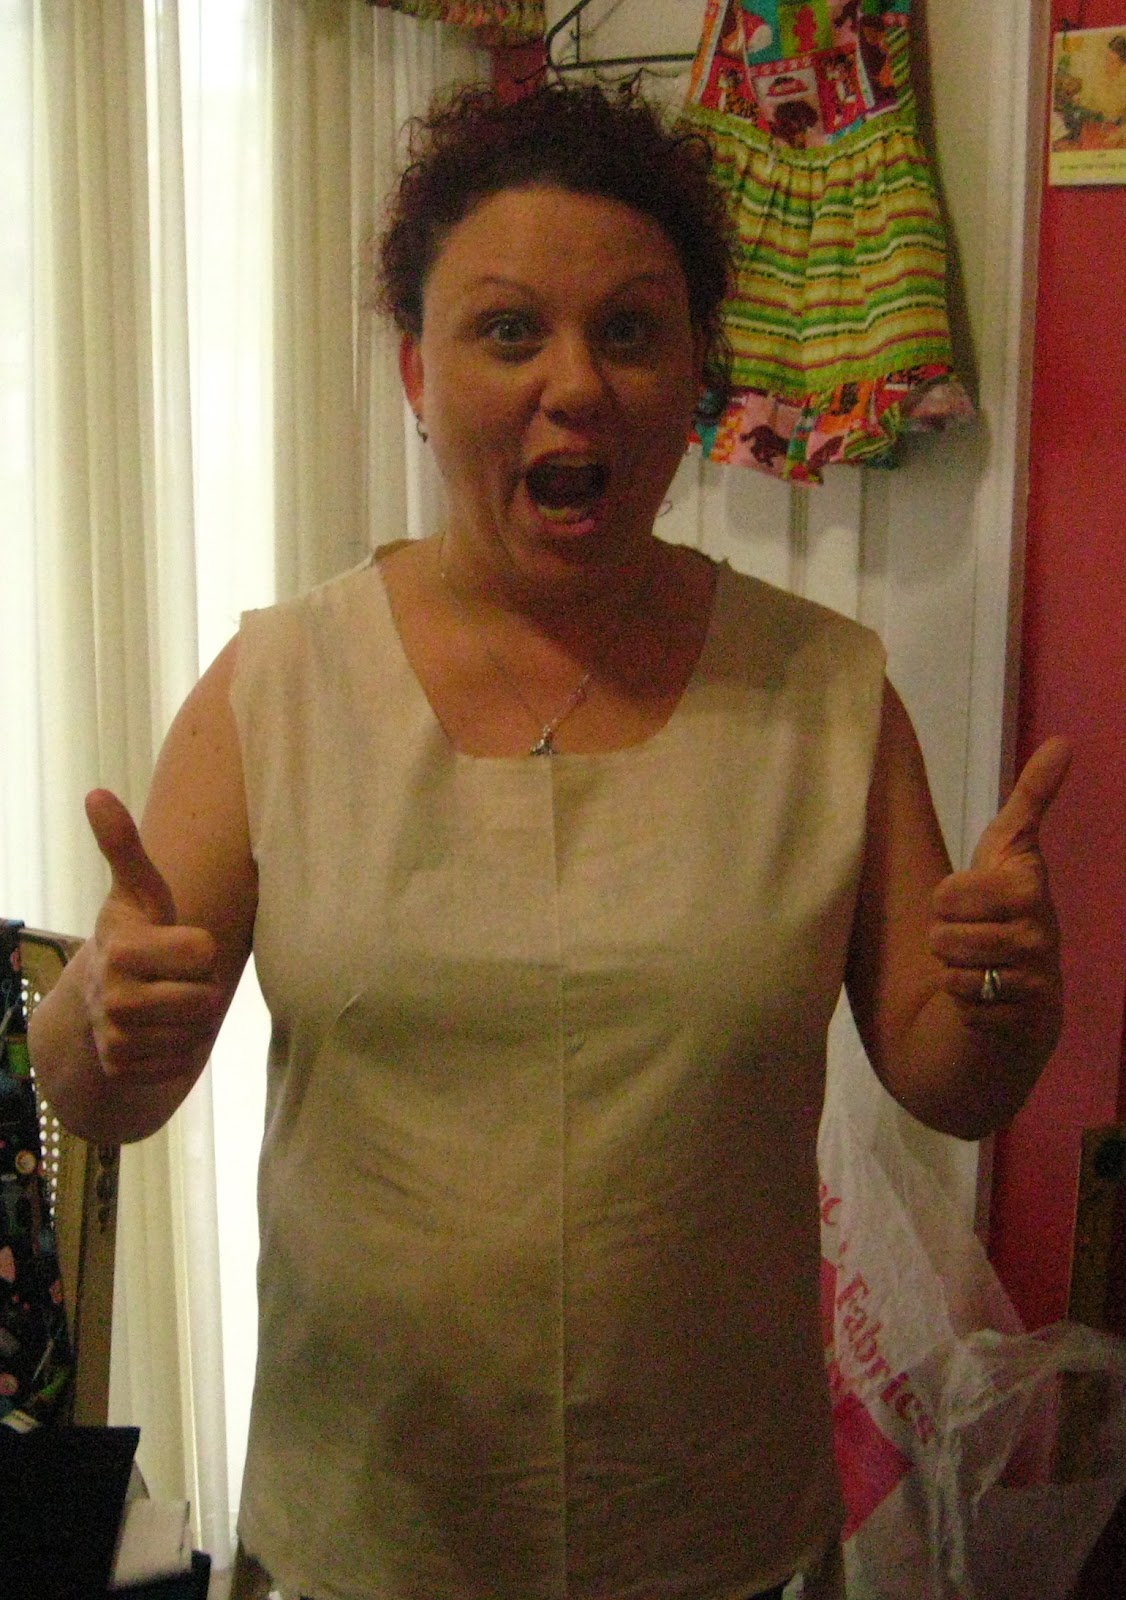


I worked on that for a while and fine tuned it and then made the dress.
 I changed the sleeves entirely from the pattern. For this dress, I just had a tiny cap sleeve in mind. I think I  look better in a  shorter sleeve than the pattern has.
There is an invisible zipper in the back that you can't see.
It's a ninja zipper!

The dress is made out of $3.95 a yard polyester  from Hancocks. You know that value section, over where they have the horrid flannel that nobody buys?  Yea, this was in the value  crazy ugly fabrics section. It rocks. I treated this fabric like it had done me wrong and I was getting payback. I took out stitches and did the darts a couple of times and the fabric does not look like it.  You know a dress will hold up to daily wear when you  put it through hell  during the making of it and it comes out lookin' good.

The dress has a natural waistline, not a modern waistline, which is very comfortable.


I lined it.
I bought the lining  at Sir's  Fabrics in Fayetteville, Tennessee in April for $1 a yard. It is the cheap,  cheap stuff.   I adore this color. It is gorgeous!   It is sort of a bummer that it is hidden on the inside but I am sure I will find ways to show it off :) This lining is not too hard to work with as it is  stiffer then the linings I usually use. Sometimes cheap  is better!

I used one of the decorative  stitches on my machine to hem the lining.


 Funny how I have all kinds of pictures of me doing this....
Do other people have lots of pictures of themselves
 holding up their dresses and showing their hems, or is it just me? 


The facings are applied to the lining and stitched on.
Then the lining layer and face layer are sewn together. 

The hem has lace hem tape attached to the bottom raw edge and then the
lace is hand stitched to the fabric. This is my favorite kind of hem!

I love using a pretty stitch to hem linings. My machine has so many stitches and
 I pretty much just use the straight and the zig zag. Sometimes I have to remind myself
that the machine can do  flowers and other cool stuff. 


The Lace Edges :
I wanted to edge the neck and sleeves with a lace. I had about 5 options I kept going back and forth between as I tried to decide. I wanted black, but I didn't want it too floral. I bought a white lace to dye black but then I changed my mind and  just went all out OCD and crocheted the lace. I wanted a width wide enough to cover the edges of the sleeves where somehow, even though they are handsewn, I could where the stitches are. The sleeves really gave me  a hard time. As I deviated from the pattern, I ended up just drafting them from scratch. I went trough two sets of sleeves trying to get these just perfect!

The crocheted lace around the
edges of the neck and arms is the easiest ever!
Each arm piece took about an hour to crochet
 and the neckline took  about 2. 


I had no idea that the dress was wrinkly.  I need to remember if
I am wearing it in the mid day summer sun,
iron it first!
      I had the dress done in time to wear on Mother's day to brunch at the mom- in-laws house.  I didn't have the lace done yet  so here is what it looked like without the lace on the arms and neckline.  Kinda plain.  I wore it with my pearls. It was overcast that day so these photos are kinda gray
That's some craaaaaaaazzzzzzzzy hair.


You could hide an army in my hair.
Seriously. An entire army could camp out
 for a year and not be seen,  ever.


The pictures with the lace on the edge  were taken  in my best bud Elaine's  back yard.  Her flowers were looking so good, I said to myself- Self! Take picture in her yard!! I picked up her daughter from school and while we were waiting for Elaine to get home, Izzy took  pictures of me in my dress.  
Thanks Izzy! You did great, kid!

Sometimes we pretend to be grown adults.
This was not one of those times. :) :) 


The Pin:
My brother gave me this for Christmas and I love it! It is a mama kitty and baby kitty! Just like me and my baby! I love kittys!   I think it looks awesome with my dress. Really goes well with my glasses!

( I used to have a black  cat, or a black cat had me rather, named Saracen.  That's part of why Matthew got the pin for me. He was a huge, pissy, part-siamese, obnoxious  total jerk, darling  of a kitty and  I loved him dearly. He was 14 when he passed.  I haven't had a kitty since because I just want him back , another cat wouldn't be the same.  Plus, I discovered after he passed that all of my horrible sinus  infections and breathing issues cleared up so apparently I was allergic to him all those years.  And am allergic to other kitties.   Bummer.) 


Why I named it the Mae Dress:
   Ok, so most of ya'll know I pretty much stick to one color in my clothing choices. Let's face it- I have been this way since about 15 and  I don't see me changing anytime soon. Black  is my color.  So please stop suggesting butter yellow or light blue for my clothing. Ain't. Gonna. Happen.  :) 
   I realized one day  I gotta start naming these things because if I say I wore the black dress,  which one? They are all black!  Kristi  ( who made this exact dress at the same time as I did in lesson but in a lovely plaid ) sent me a short list of some names and I really liked them. She felt a nice one syllable name was elegant and here is what she said 
"Here's why I see these 1 syllable girl names. It's strikes me as a 1920's feel. Add a low waisted sash and voile. Maybe I'm looking at it all wrong but it's 1920 and 1950's all in one to me and that's the name vibe I get." 
    Some of her options were Molly (can't use it,  have a niece named Molly), Anna ( I knew an evil Anna, can't use it), June( name option for a girl if I ever had another one so  that didn't work for me). So I thought about it- I made it in May but that is a dorky name for a dress. So Mae it is!  Mae is elegant and simple  just like my dress!  (There is that whole Mae West association but I don't mind that :) )
Now I can write to Kristi and tell her I wore the Mae dress and she will know which dress  I am talking about! 
    I know a lot of bloggers name each and every  of their dresses and I have to say, sometimes I think it is kinda silly. But it does cut down on confusion! 


Things I will change on the next version:
Oh yea. I will make another.   Once you have made the alterations to a pattern, the time consuming part is done! Use that work again! I want a sleeveless version. I will place the bust darts a touch lower.  Somehow they moved up on this one and I couldn't fix it because I followed the instructions and trimmed the dart.  (Do not trim a french dart until you are positive they are  in the correct place!!! ) The next dress will be 2-3 inches longer. Maybe change it to a V neck....

Pale, pasty and ready for summer in my hand-made 1965  black dress!!


Sunday, June 10, 2012

Nina's Amazingly Awesome Dress

I MADE MY DRESS!!!!!!

Yesterday was Nina's last lesson  with me. She is moving next week. She has taken lessons with me for 2.5- 3 years.  She started with me when she was so small- now she is 13 and my height!  She  was one of the first  students I had when I first opened up my business.  I am going to miss her- she is a super creative, smart, interesting,  genuinely nice kid.   Her parents hope to move back to this area in a few years and  I really hope this happens! I would love to help Nina make her prom dress in high school! 

My business benefits from the flow of military folk coming through  the area. I always have new students. But sometimes it's a real bummer because I meet the coolest people   and then they move away. I 'm talking to you, Kristi. And Amy , Samantha. and Amanda and the rest of ya's that have moved away.  And now  Nina and her  mom Doris are moving. Stop it people. Just stop the moving.  Or you can move but you still have to come back often to see me for lessons! :)


 Nina wanted to make a summer dress for her final project with me.  She had a drawing she had done of her ideal dress and I found a pattern in my stash that matched it!   We used this pattern: 


I have used this pattern a few times to make dresses and tops for Eden.  Here she is in a  couple of them last summer:

Eden wears all of them often, she likes them as they are very cool  in the summer heat  and super comfy. 

 Nina  first made a muslin   of the dress. We made it out of plain purple cotton so that she could wear it instead of actual muslin.  We made it shirt length to test it out.  It went very well, fit perfect and  her mom says that she wears it to death! 
I knew that this dress  would fit,  I wanted her to make a muslin to  practice the techniques in the real thing. We made straps, gathered the  bottom part, made a lining. I put in the zipper.
Here she is in the practice version. She looks so lovely!


Then we moved onto the real dress. Nina chose her fabrics very carefully. Isn't it so cute on her? 
She LOVES the highlighter yellow fabric.  She told me if she could have a lot of clothes in that color, she would  be very happy. 
The rest of us  would all be blind. But she would be happy. 

She is showing off the ruffle!


Nina's Mom Doris, started taking lessons with me in the new year.  She did the gathering  where the skirt attaches to the bodice.  I was showing her how to help Nina and then  we just did it.  :)  So I think this is awesome- Mom and daughter both sewed the dress with me!

Back View 


Ruffles are the painful part of any garment for my Saturday Girls ( age 9-17) .  They want to add them onto every garment  because they are so cute but they whine like I am torturing them unmercifully when we are doing them.  I have come to realize, that it isn't that the ruffling is  hard or that they don't get it: they don't like them because  it takes a while. It is slow going.  All the pinning and thread pulling and pressing and sewing  very  very slowly  just makes them crazy.  They still choose to do them, as they are cute but I usually end up doing most of it. :)

On the bottom edge ruffle of Nina's dress , I only pinned and gathered  about a 1/4  of it.  She did all the sewing and pressing. And with almost no whining) :) :)  I was very proud of her!
Attaching the ruffle.
Look at that serious face.  She was all about that ruffle. 

I love the tickled-pink-with-herself smile. 
I bet you she doesn't take this dress off for at least a week!


My favorite part of teaching my little ones ( I am sorry Nina, I know you are thirteen and a teenager now but you are still one of my little ones)  is that look on their face when they finish up with an item and put it on. See that picture above?   That's what I'm talkin' about. 


Goodbye, Nina! 
I have enjoyed teaching you! 
Please send me pictures of what you sew without me!!!
I will miss you!


And the rest of my students, take note!!! You  are absolutely FORBIDDEN from moving away!
No more birdies flying away from the nest!


Friday, June 1, 2012

Birdy Baby


Some old friends of my hubby's had a baby recently and I made a couple of outfits for baby Alice. 
The first one was a bubble romper. I used this pattern:   Ruffled Baby Romper. This is an adorable pattern. I actually saw the pattern a while back and  loved it- I just needed to find me  a  baby to make it for! When Graham and Rowan popped up preggers, I  was very excited as  there was a baby that needed new outfits!  
I love to make baby clothes. Some of my sewing projects can get pretty large, like drapery panels or cushions and sometimes it is nice to just sit down and cut and sew little things. 
I made the 0-3 months size . It seemed so small to me when I finished it!  My baby is nine years old now,  I forget how tiny babies can be!  The bottom of the outfit is basically a bubble with a front bodice section and ties to go around the neck. It is fully lined. Easy peasy  and so cute. 
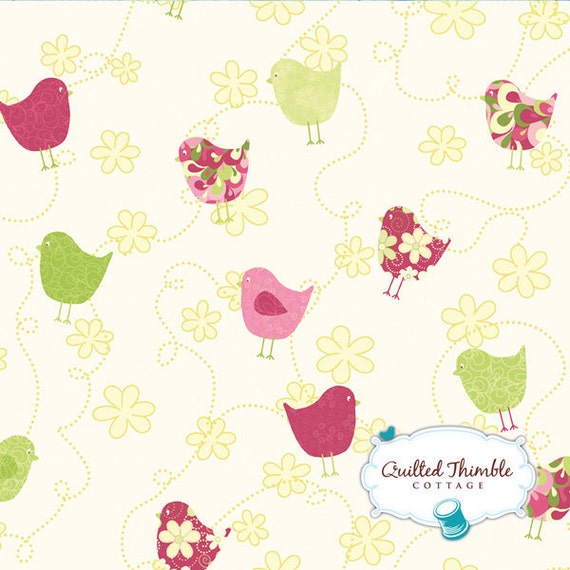
The fabric was chosen special  for baby Alice  with birds on it. Her mama is birdybooty so little birdys were a must! 

This is the front of the romper.

The back view.
There is nothin' cuter on a baby than a bum full of ruffles. 

I was worried that the little bubble romper might be too small so I made another outfit just in case! This outfit is 3-6 months. I have known some babies to wear this pinafore  for the first year or so as it is loose so this is a nice item to make for babies- they can wear it a while.
I  made a pinafore using this pattern:  Ruffled Pinafore and  a little pair of bloomers  to go under it.
The back of the pinafore is a big ruffle  with a bow and the bloomies are covered in ruffles. When  baby Alice  is wearing these, her whole back side will be  covered in fluff. I love covering little babies in ruffly fluff! 

The front.


The back. 


The pinafore with the bloomers underneath. 

The neck and arm edges were wrapped in  tiny double fold bias tape. 

The bloomers were made from this pattern: Ruffled Diaper Cover . I love this pattern. I have tested a bunch of baby diaper cover patterns and this one is the best.

Front


Back. 

I added little labels into each of the items saying what size it is.
I wish I had done this to my daughters stuff I made for her
because now  I have no idea what size some of it  is.  

The ruffles are all done the same way- I cut long strips of fabric and used the 1/8 rolled hem foot to hem the top and bottom edge. Then I ran two strips of basting  threads along the top edge and pulled those to create gathers.  It takes a while. It is easy to do, just time consuming.


The Fabrics:
In these photos the fabric looks kinda yellowish but in reality they are pure white.
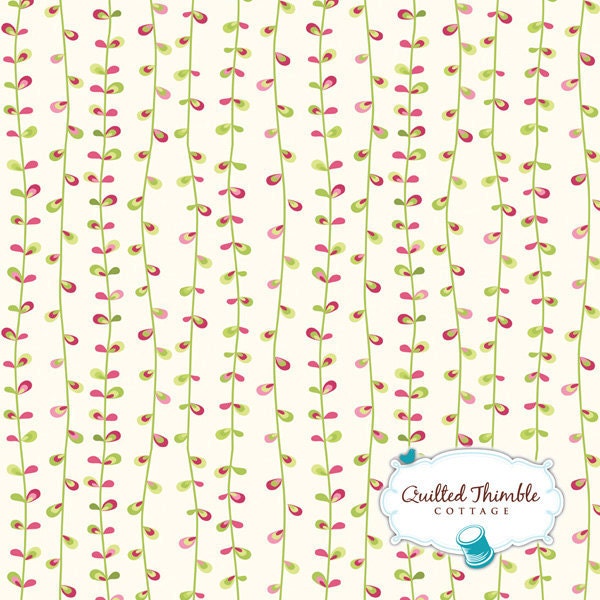
This fabric is soooo cute! I love the little swirly birds. And the coordinating fabric is just as cute- the little feathered lines accent the birds perfectly.  I got it on Etsy- the seller seems to be out right now so I will link to them when I see they get more in. These fabrics were $9 a yard- pricey for cotton fabrics but worth it for the cute print! And two baby outfits for $20 isn't bad :) :)

Pink-A-Doodle - Flirty Birds


Pink-A-Doodle - Flirty Birds (6819-23) - Emma by Michele Scott - 1 Yard


Pink-A-Doodle - Leafy Vines


Pink-A-Doodle - Leafy Vines (6820-23) - Emma by Michele Scott - 1 Yard


I have two students pregnant and I just saw last night that one of my former students who moved away ( sniff sniff) is preggo with twins so  you will be seeing the bubble rompers and the bloomies again!
I am going to bug the new parents for a picture of baby Alice in her couture outfits. I will post 'em when I get 'em :)


Happy Sewing!


Wednesday, May 30, 2012

Donna's Nightgown


Donna comes to see me on Tuesdays. She originally started taking  sewing lessons to learn how to  sew things for her grand babies.  That changed very quickly and  now sews  mostly for herself! :) 
She made this nightgown for herself  a few weeks ago. 
Isn't it lovely? She used a very pretty  eyelet fabric. 


The pattern is  Simplicity 3504, the same pattern I used to make this shirt . 


For the inset, she used a solid white cotton and inserted a bit of lace into it. Above and below the lace is an heirloom stitch.  We used a wing needle to get the traditional hand stitched look. 


The lace we used is  lace hem tape. We used this method to insert it. 


 For the sleeves, she omitted one of the sleeve layers . The pattern shows the flutter sleeve with two layers.  On the edge of the sleeve she used a satin stitch for the hem. We set the machine to a short length and zig zagged over the edge a couple of times, stretching the fabric slightly as she sewed. This produces a soft  lettuce leaf effect on the edge.  This type of hem is nice and floaty and allows the fabric to drape nicely. We were worried if we put a double fold hem , or even used the rolled hem foot, the hem might be stiff and  the sleeves would stand out away from her arms giving her a bird in  flight look. We wanted soft flutter sleeves and this type of finish is perfect for these sleeves.

 I love how she changed the shirt pattern into a nightgown.  To change it from a shirt to a nightgown, we added a bit more ease  and lengthened it. Pretty easy alterations! :)
Great job Donna! It is lovely!
Sweet dreams to you in your  pretty new nightgown!


Thursday, May 10, 2012

I can make anything- even beards!

Last week Eden had a school project  about famous explorers She had to pick one and write a  report, make a poster, and dress up like the explorer.
Eden chose Jacques Cartier.  She came home from school all raring to go  to get her costume together. She said some of the kids were complaining about having to come up with a costume but she was excited. She has realized that her mother is storing a lifetime of costumes and dresses and vintage who-knows-whats  in the closets and attic of this house. I did not have a beard however. My  collection is   lacking in the faux facial hair  area so I googled how to make one. 
How did we ever live without google? 


The beard is felt with ribbons sewn into the sides to tie around her head. It is the easiest thing to make in the entire world and so fast! It took 15 minutes! Just two pieces of felt, some ribbon. That's it.   I got the pattern and instructions here:
It is comfortable to wear and she loved it. 
The wig is mine, yes I used to wear it  :) ,  the cape is a 1970s faux fur  cape that I used to wear all the time. The shirt is the white shirt from her christmas  outfit,  and the fox is  to represent the fur trade. French explorer dude came to the new world looking for gold and fur.  The boots are her favorite Justice boots. 
We had planned the costume with a hat but at the last minute we left it off- she left it because it was hard for her to get the wig on  on her own much less get the hat to stay and I chickened out on sending my 1960's velvet and satin perfect condition Jackie O type  pillbox hat to school with a third grader.
 I just couldn't do it. 

Here is the man himself:


And here is his  likeness as done by a third grader.
 
This is her I am a serious explorer face. 

I can't really tell them apart! Can you?  :)  

Sunday, May 6, 2012

The Honkin' Huge White Panels of Death. Part 1.

 I am  still doing windows here in sewing land.  I know it looks like I have just been making clothing but  in the background there are windows going on. 
I showed you some cushions a few weeks ago that I did for Judy & Rob's NC cottage. I am now working on the windows. I will be making  pinch pleated panels, banded on the sides in blue denim. There will be buttons in denim up at the pleats. They are going to be AMAZING!
White duck , double width, pinch pleat panels. The very description makes me almost break out in hives.  There is a lot that goes into these.

The panels will look just like these that I made last year, but with blue denim on the sides & buttons. 


I thought I would take pictures while I was working on them to show you what goes into these monsters  beauties. 

First:
I ordered 41.5 yards of fabric. Why so many yards you ask? Well, I will be doing three  sliding glass doors in this fabric.  There will be a set for the great room, the guest room and the granddaughters room. each set takes 11/5 yards. Plus there are valances in the great room, and cording for cushions. 
The UPS man loves me. Have you ever lifted 41.5 yards of heavy fabric?    When I work with huge bolts I just flop them onto the floor and roll them around. He actually had to lift it from the truck to my porch. Poor guy. 

Next:
I clean the entire area  that I will be working in. I roll out fabric in the living room, so I vacuum that area super well. The I also clean up the dining room, scrub the table and vacuum. I usually do larger work on the dining table. It is cafe height, it is easier to work on than my sewing table. And so much easier on my back!
Now these panels are pure white.  So on the days where I am working on these, I cannot wear any make-up or hair products, so that it does not get anywhere on the fabric. I also cannot wear colored fingernail polish as  the fabric is thick and if I run my nails across it like to brush off threads , the polish  can leave a streak on the fabric.  I also wash my hands often so that any oils or anything do not transfer to the fabric. My hands & nails look horrible right now as this fabric is really drying on the skin. Plus the constant washing. 

 I roll out the fabric and check it for flaws. On printed fabric, this isn't as much of an issue. On pure white fabric, it is. They stick out and can ruin a perfectly made panel.  And let me tell ya, my panels are perfect. I guarantee that when I deliver these babies, they will be pristine. No a spot anywhere. 


Look here: this is a huge flaw. The red  is actually woven into the fabric, so this happened at manufacturing. Ugh. I can't cut it out, I have to try to go around it. So what I do when I find flaws is  put a big safety pin  on the flaw.  The pin helps me to spot it easily when working. Then as I cut it out or make it, I try to do it so the flaw is cut away or hidden somewhere.  I did add in a bit of extra fabric when we ordered to compensate for this. Fabric can arrive with flaws and the companies consider this ok. They tell you to to order more in case there are flaws.  On this bolt, I have only seen red and blue threads in it. The last time I ordered this fabric, I actually had to order more yardage because when I arrived there was a HUGE obvious flaw in the weaving that ran across the fabric and there was no way I could hide it in a hem or seam.


This is my assistant, Sophie. She was trying to convince me to play instead of work. Usually, I let her outside when  I vacuum and lay the fabric on the floor. Black dog and white fabric do not mix:) I let her back in when the fabric is up on the table.
Hey mom- don't you want to play?? I  have my santa squeaky!
 Put down all that white stuff and come play! Squeak Squeak! 

Here the lengths are being sewn together at the sides.  This fabric is 54 inches wide. I cut the length that I need twice and then sew it together. You end up with a huge wide panel.
I try to keep as much of the fabric up on the table as possible but it is heavy. So I sew  a foot or two and then stop re-arrange, move the fabric up on the table and then sew some more.
Once I have the face fabric done, I do the same to the lining, and interlining if there is some. We did not interline these panels as this set of glass doors has an overhang above it to help block some light. Also, this white duck is HEAVY!!! So I only interface this fabric if the window gets direct sun or if we are looking for extra  insulation on the window. Or if the fabric is thin. This fabric is thick.  Mr. Thick Thick Thickety Thickface Fabric  from Thicktown, Thickania. 

Once I have the face and linings cut, sewn, hemmed then I lay them out on the floor again and put them together . The lining is placed over the face fabric, wrong sides together. then I pull and smooth and tug again until they are perfectly lined up together. This can take a while.


The lining is placed two inches from the bottom of the face fabric. 
Then I pin the sides,  and sometimes I baste them in place. I basted these because they are so huge they move around a lot. Basting them helps me get less pins stuck in my hand. If I leave the pins in the sides, when I am working with fabric this large, it is so hard to watch out for them. 
I did get a pin stuck really deep in  my thumb.  I had to wait for the bleeding to stop  so I could go back to working. Blood and white fabric, don't mix. 


Then I measure, measure , measure and  measure once more and add in the buckram to the top and  fold it  over. I use the iron on buckram. I know there are purists out there that would never ever use iron on buckram, it is a modern invention of evil. But you know what? I like modern inventions of evil.  I have nothing against progress and I consider any iron on product progress.  You mean I can adhere it in a few minutes instead of wrangling with yards and yards of heavy white fabric at the machine?  And it looks the same as the sew in kind? Sweet! Sold!


I fold it  and mark the pleats. I use a piece of wood with the space and pleat marks drawn on it. This cuts  down on measuring time and makes it sooo much easier. 

Then I pleat the bitches sweet lovely cooperative panels.  I pin the pleats, then one by one sew them on place. 


 The next step is so band the sides.  Then add the buttons. 
Then I hang them for two weeks so I can train the pleats. And  check them over a million times . 

Then I do it all over again with the girls' room panels. Then I do it again with the guest room panels!
They are going to be awesomely gorgeous so all of the work that goes into them is well worth it.