Wednesday, February 16, 2011

Saturday Girls

Every other Saturday is Lesson Day around here. I have 6 girls from age 10-17. I start at 9 am and I finish up at 6. Lesson days are so much fun! I get to hear all about the trials and tribulations of the 5th grade (so cute!) and high school (nope. don't miss it. ) The girls are all so sweet and really devoted to learning all about sewing .
Wanna meet them?


Kayla started with me in November, She had done a bit of sewing with her grandmother but as her grandmother is in a different state, it was hard to keep it up. Kayla is very interested in making just about everything she sees. Each week when I show what I have been working on, I know she is going to say " I wanna make that!" Kayla has finished our first project together- a stuffed heart wall hanging that incorporated some different stitches on the front, her initials and a small topstitched heart at the bottom. Kayla really was careful stitching around the curves of the heart. Great job Kalya!


Next is Rachael. Rach has been taking lessons with me for about a year and has graduated up to patterns! Woohoo! Here she is cutting out her tissue pattern for her Pajama pants. Everyone starts out with the pattern as their first one. It doesn't matter to me if you are 10, 30 or 87- when we move onto patterns you make this one. Why? It has two pattern pieces and is easy to alter.
In the background of this photo you can see some of my recent projects hanging up. There are itty bitty dresses I made for my new baby niece to be Molly ( Steff! If you see this picture before the shower DON'T LOOK!! ) There is also the skirt I made from the Sew Serendipity book. Also the muslin and version one of a jacket from the same book. The jacket still needs buttonholes but I haven't done them yet because I got mad at the jacket. ( Long story. I will tell that one some other time. )


Then we have Nina. Nina is also making the pajama pants. She is cutting out the muslin from her pattern pieces here.

When we make a muslin, sometimes it is hard to tell what side is what . So we write on the fabric with fabric pen. I thought it was cute Nina signed her name underneath the note to ourselves. And put a little smiley face.


This is Haley- world meet Haley, Haley meet world. Haley is so funny we have blast at lessons. Here she is modeling her First Skirt. It is hard to see in the picture but the fabric was actually a really soft white and purple check. She did a really nice job. Currently we are working on a tote bag. We cut the pieces last week and will be assembling next lesson day.

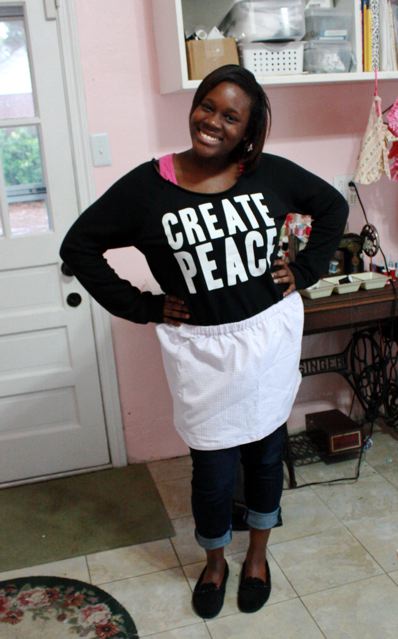
Tori began lesson with me in December. She doesn't say too much but I can see the gears turning in her brain each lesson. She is like a sponge just soaking up all the info. She is working on an envelope pillow here with buttonholes. She got an awesome new machine a few weeks ago and buttons are a breeze. Hooray for the automatic buttonhole setting on sewing machines!
Oh and see my pretty pretty chairs in the background? They go with my pretty pretty new table.


And last we have DAISY!!!! Daisy had to drop out for a little while as school commitments we taking up all of her time. But she is back and we are working on a pair of pajama pants. Daisy has been accepted to a fashion design program for college next year. I forget where... I think it she said Mary Mount up near DC. I think. I will check. Her family is also moving this summer so we are now in cram mode! We have to get as much knowledge into her as we can before she goes. So after this we are going to do as many items from patterns as we can fit in :)!! Here she is cutting out her muslin from the altered pattern.
And that's it- those are my Saturday Girls!

You might say- there are two blog posts in two days! How is she doing this? What lit the fire under her? Well, I am stuck at home with strep and had to cancel lessons. I am also procrastinating finishing up a huge window proposal for a client so I am blogging :) :) :) I have to get out the calculator , use all available brain cells and put all of my crazy notes and samples into some sort of coherent professional looking presentation.
I have also done all of my emailing to clients and students. I checked both bank accounts. Read the news (Hooray Egypt!) . Read MSN gossip ( Charlie Sheen can drop off the planet- I am so sick of reading about him!) . Checked facebook. Looked at slide shows from fashion week. (Really people? Some of those runway fashions looked very badly constructed. ) I read some sewing blogs. I converted a step-by-step off of Sew Mama Sew into Word so I can print it out and work on it down in the sewing room. It will be a cute top for Eden for this summer.
I have run out of things to waste time with so I guess I have to do this proposal ! :)

Tuesday, February 15, 2011

which of these things is not like the other?

Leticia has started commercial patterns and for our first pattern we made PJ pants. I use this pattern for the first commercial pattern my students tackle as it only has two pattern pieces. The alterations are also fairly easy .


We altered the pattern a little bit and made a muslin. She wore that around her house once or twice to get an idea of how else she wanted to change it. We then altered the pattern again tp suit her and made another muslin. This time it was perfect so she then made the pants out of a fabric she chose.
I love this fabric. I love the happy dancing skeletons and all the wonderful flowers.


Here they are on my beautiful , lovely sewing table.


I also love that we added pockets to the pants, which do not come with the pattern. We just drew ourselves a little pattern piece right there as we were going along.


For our next pattern project, Leticia got to go pick out her own pattern. As she is a part time nurse in school she wanted to make her own scrub tops

She chose this one. Over all the pattern is pretty good so far. We are about halfway through the muslin. This pattern has a lot more pieces to it- front back, 2 pocket pieces and a neck piece. The pattern instructions could have a whole lot more clarity in them but I just write in pencil all over the pattern as we go along. When she makes this on her own I will have filled in those gaps for her :)
Now here is where we had a bit of a giggle. Look at the pattern front at drawing of the gal wearing the scrub top. She has super long barbie legs. This gal does not eat breakfast, has birthed no babies and never eats dessert.
Now when we open up this pattern, look at what we see on the inside! Do they look like the gal on the cover?

No! They do not! They look very different from the gal on the cover!

You can see on the far right one, I drew in what Leticia and I kinda look like. (Less belly for both of us and in my case, less behind.)


Really what happened here is that the pattern is offered in two multi sized packets- XS- Xl and XXL-6X. As the sewing instructions are the same for all sizes, both packets just have one set of instructions. This is a how to alter the armseye for different sized arms. These drawings are really for the larger sizes. But even the larger sized packet features miss-never-eats-a-muffin: same drawing that is on the cover of the small sizes.

We just thought it was funny how differently the pattern was portrayed outside and then inside.

I guess if they had the other larger size gals drawings on the cover, then no one would buy the pattern. We all try to buy clothing that we think might flatter us in some way. But no pattern is this world is gonna make a gal go from what is drawn on the inside of the pattern to what is on the outside. When they do, put me down for 2!


Thursday, January 13, 2011

Nina's Valentine Project


Nina is 11 years old and has been taking lessons with me for about a year now. When she first started she was kinda quiet. She was very interested in sewing, I could tell, but I would have to ask a lot of questions to get her to say what she liked and didn't like. Then she came out of her shell a little and she started to talk a little bit about her ideas and ask questions. Along the way we did projects geared toward learning basic sewing skills like planning the project, cutting out pattern pieces, working the machine and sewing a nice straight seam. With each project she would get a little more confident with the machine and her sewing ability.
I use a really cute book to get ideas for projects for kids. I usually end up altering the instructions a bit to suit the individual child.

Nina made a cat/fox from the book. The project was a cat or a dog that used many different pieces. She decided to make a two tailed cat/fox. Nina loves animals so this project was really fun for her as she got to combine animals! It turned out adorable! It gave her practice cutting and sewing small pieces. We did not use the method in the book that uses wax paper as the pattern pieces- we just photocopied the book page and cut them out. She had to go slow and stitch carefully around the small curved edges. This project was great for teaching patience and carefulness :) We used some hand sewing in sewing on buttons. Then she did the cutest thing! She glued cotton balls onto the ears and tails to make soft fluffy tails.
Here it is ! :)


Now lessons are hoppin' as when I present our next project, she is just bursting with ideas and ways to make it her own.
Here she is with her first purse that she made. She chose the fabric as it has cute dogs on it. It is fully lined and has a rick rack trim on the front:


For Christmas presents we made tissue holders. We used only hand sewing with this as I am still trying to convince them that hand sewing is necessary. For some reason the young ones think that sewing means just using the machine and only the machine. We also practiced sewing on buttons, tying knots and cutting using the pinking shears. The pinking sheers are hard for the young ones to hold onto sometimes. I am trying to find a smaller pair but so far haven't seen any.

She made this one for her grandmother. I forget why she chose the green fabric and ladybug theme but she had a really cute reason. These tissue holders fit a travel size tissue pack. They are made of felt, which is about .25 a sheet. I like to buy it on sale at Joann's for .19. The felt is very forgiving to young fingers trying to work a hand needle. Each of the Saturday Girls made this project with me in lesson then took home the instructions so that they could make some on their own to give as presents for Christmas.


For Valentines day I had planned a project that we could do in an hour. A year ago, this would have taken us two lessons. Now when I talk about creating a pattern piece, sewing it with the seams showing, using pinking sheers, stuffing, etc. she understands what I am talking about and we can get right to the fun.
I had to project idea for a Valentine's pin- we would cut felt shapes and stack them together, sew them , add buttons or whatever decoration she wanted, then stuff it and glue a pin onto the back. She loved the idea but wanted to change it. She wanted to make a Valentine's lollipop pin for her dad. I think that is just fantastic! We are at the point where she understands the idea I have for the project, but redesigns it. (To me this also means I am doing my job :) She gets it! Hooray!!)

Here she is after creating the pattern piece for the lollipop. I have discovered that people learn the intricacies of patterns easier if they start out making them. So we drew out the lollipop and heart on paper. She also thought that it would be cute if the lollipop already had a bite taken out of it.


She then pinned the pattern pieces down and cut them out of red felt.
She was very good about keeping her fingers back and carefully turning the felt piece to stitch around the curves of the heart. Curves are not easy to sew, especially small ones, like the heart. She took it slow and did an absolutely beautiful job. And see how her fingers are back outside of the throat plate? That is exactly how they should be! :) :)


We use a piece of Peltex for the lollipop stick. Peltex is very thick super sturdy iron on interfacing. I use it for the bottom of purses, to make christmas ornaments and to back decorated pins. Nina then pinned it to the backing and sewed around the edge of the lollipop.

Here is the finished lollipop.


We glued a pin onto the back.

And here is one last shot of the lollipop. She wanted one photo to have the hail in it. As we were finishing up the lollipop it started to hail. It was crazy! Luckily it wasn't the really big car denting kind of hail. Just little granola sized hail.


Nina also wanted the lollipop to say" lollipops are like love" But I told her that she should draw her dad a card and put that in it. There was just no room on our lollipop to write" lollipops are like love" :) :)

Happy Valentines Day everyone!

Tuesday, December 28, 2010

Doug & Diane's Kitchen Valances


Happy New Year!!!!! Woohooo!!! Christmas is over!!!! Please do not think I am a scrooge or a humbug- I am as gung ho happy about Christmas as you can get. But this year I was really ready for the peace and quiet of January.

Right before Christmas I finished up with Doug & Diane's valances for their kitchen and laundry room. They wanted matching valances for a bay window in the kitchen, a window over the sink and one for the laundry room, which is right next to the kitchen.
Doug & Diane are the cutest couple! They are two of the nicest people on the planet. They are so fun to work with as not only are they nice, but they have really great ideas about what to put in their house. And speaking of their house- it is beautiful! When I was going to install these valances, it was a couple of days before Christmas. As I was driving to their house, I said to my self "Self, I bet their house is the most beautifully decorated on their street" . And I was right! :)


Here is the Bay Window we were covering.


And here is the sink window:


When we started to talk about the style for the kitchen, I asked them what they liked. Doug likes tailored. He doesn't want any fluffy, frilly business. Diane liked the idea of a handkerchief valance: she had mentioned one in a friends home that she liked. The continuous style appealed to her. Doug did not care for the casual look that those can have. I combined their likes/dislikes and realized I had to find a valance pattern that was tailored not frilly, continual on piece design, could incorporate two fabrics, and be able to be altered to accomadate two smaller windows over the sink and in the laundry room, and also look great over the main bay window. No problem! And here was the kicker: install in less than one inch of space.
Look at the pictures above of the bay window and sink window- I had an inch above and an inch to each side. That was it. Yep. 1 inch.

I looked through my patterns & books. Nothin'. I looked on line. Nothin'. There were a lot of patterns that fit a few of the criteria but not all. And then I went to the Pate Meadows Window Treatment pattern website. Jackpot!


I love Pate Meadows patterns. They are wonderful because:
  • They include very clear directions with drawings and detailed descriptions.
  • They are printed on heavy white paper. This paper is much easier to work with than commercial tissue paper, especially with home decor fabrics.
  • They are easily alterable for different size windows.
  • Customer service is awesome! They ship fast and have great communication. Also, I lost my install sheet at some point for the Erin valance . I couldn't remember how long the side bar pieces needed to be cut for the supporting frame . I called them and they were so nice as to read that part of the pattern to me right over the phone!
  • They turn out freakin' gorgeous every time. And I mean absolutely freakin' gorgeous.
Drawbacks:
  • They are not cheap. Average price: $29.95. Yea. For a paper pattern. I am the girl who won't purchase commercial patterns unless they are on sale for .99. But I will buy these, they are that good. Spend money where it is worth it- I always say. And Pate Meadows patterns are worth it.
  • They always seem to overshoot on the fabric estimate. I now know to fully figure out my own yardage - I don't go by their estimate. I draw out exactly how I am going to lay out the pattern pieces on the fabric and figure out my yardage that way. Yes, some extra is good: I don't do a project without some sort of extra factored in. But each of the 4 patterns I have made so far had much higher fabric estimates in the pattern than it turned out I needed. That is my one and only issue with the patterns.

We chose the Delaine pattern. It is a wonderful design that incorporates two or more fabrics, has a welt corded edge (Doug likes welt cording :) ) , can install in next to no space and is just really cute!
We had found the right fabric by accident. In my search for the fabrics for their den, this fabric was one of our options. It didn't work for their den, but it was perfect for the kitchen.

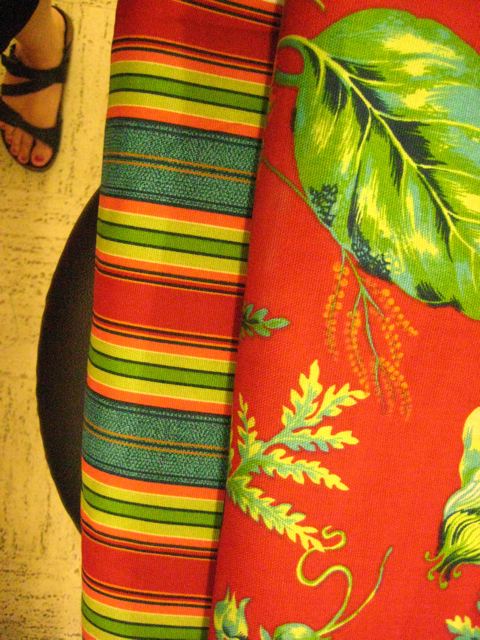
This is the Stripe:


When searching for a fabric it is sometimes easier to take pictures, rather than write down the name , price and colors of each option. Plus, some fabric stores are chintzy with the samples so taking a pictures gets me a much better idea of the pattern. This is the end of the bolt for the stripe. I found it at Hancock's for $9.99 a yard.


I found our main floral fabric at Blaney's in Norfolk. Way out on Military Highway past Janaf, past the airport = out in the city version of the boonies. They have great prices and are very nice. I left my favorite sweater there in early November. When I went back in they had it right there for me, knowing I would eventually be back in :) I was sitting in front of their counter, checking out thinking that the sweater on the chair looked very much like mine. The one I couldn't find.


The colors on the fabric matched the colors in the pretty artwork that Doug & Diane have in the kitchen. We all liked the red background and the fun, painterly flowers in bold colors. And that it was $14.98 a yard. That's not bad.
I almost had a heart attack when I went in to buy the fabric. It had been about a month since I had gotten the sample. I went to where the fabric used to be located and ti wasn't there. I searched the store and couldn't find it. I believe I was slightly hyperventalating. When I asked about it, they helped me search it out- it was hidden in a corner behind a ton of other bolts and down to the last 6 yards on the bolt. Luckily, I only needed 5.5! Whew!!

The stripe that I found at Hancock's did have a matching floral that went with it but it was very tropical and that is not the look we wanted in the kitchen. I must have been researching this fabric in the summer because you can see my foot in the left upper corner! I think I took these pictures when I was finding fabrics for their den... I had liked the stripe for their home from the beginning :)


To make these valances first I made cording! I learned a most wonderful way to make cording from Mary Parker, slipcover maker extraordinaire. Out of Ptown, Va. You make a fabric ' tube', cut around it and you have one long perfect continuous strip to cover the welt cording. It takes half the time of cutting out each strip.
Here I am cutting it out. I took pictures while I was creating this cording to put into a lesson for my students about welt cording.

You end up with one incredibly long beautiful strip of fabric!

Then I cut out all of the pieces for the valances. Each swag and pleat section were seperate pieces. So I was cutting for hours, it seemed like. Each valance has a face fabric, a back lining and a flannel interlining.
Here is my dining table with the pleat fabric laid out on it ready to cut out the pleaat sections.


This is the face fabric of the valance sewn together. Look in the back! There is my Christmas tree! :) In this post we have gone from a shot of my sandled foot in a fabric store in summer to my Christmas tree. I guess we weren't in a hurry on these :)


I then applied the cording to the face fabric
  • Here is the greatest tip you will ever get about cording in your life: sew it on with the CORDING ON THE BOTTOM and the FABRIC on the top. The welt cording should be against the feed dogs. This ensures that the fabric does not pucker.


In this photo I have finished sewing on the cording and have sewn all three layers; the lining , interlining and face fabric, together. I then turned it inside out, slip stitched the end closed, pressed and sewed the pleats in place. Pressing did take a while as you really have to press the living sunshine out of the fabric to get it to stay.


Once I got all three valances finished I needed to put my idea of how to hang them into motion. Pate Meadows uses really neat adapters that screw right into the wall . They extend 3.5 inches from the wall. The valances have loops sewn into the pleats that the valance hangs from on the posts.
We couldn't use them. The base of adapter post is about 3 inches across. We only had an inch of space in which to install. Again thank you o inconsiderate home builders who didn't think ahead that these lovely homeowners would eventually want to hang window treatments in their home.
So my idea was to cut dowels into 3.5 inch pieces and paint them to match their moulding (Luckily we just moved and I still have a can of ultra super bright white gloss paint!) Then we would screw a decorative knob onto one end and the other end straight into the wall.


This is my dowel painting contraption that I made. I took a pice of scrap wood and hammered nails into it, leaving about an inch out of the wood. The dowels (cut and drilled by my sweet husband) could then stand up on their own . This made it so easy to paint them.


Here is a side view of the post adapters from the Pate Meadows website. They are really nice, I was upset I couldn't use them. I do think the dowels turned out fantastic as they blend right into the molding so you don't really see them at all.
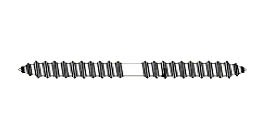
Double sided screw. Also called a splicer screw. Use a #8 size for drawer knobs.

Here is the final valance! The posts that the valances hang on are installed in between the windows in that one inch of space and on teh molding itself.

The bay window:
See how the fabric matches thier paintings on the left side? perfect!
The bay window and the sink window. While Doug and I were installing, Diane was searching for and found her mothers pound cake recipe. I cut it out of the photo but the counter was piled with butter and cream cheese and all things yummy to make pound cake:)
Here is an up close view of the front of the bay window valance.
The laundry room window. I suggested that they paint one wall of the laundry room red. Wouldn't that look really cool?
The sink window. I love the Santa's on the window!
Here is the side of the bay window valance.

Sunday, November 7, 2010

Halloweeen!

Ahhh. Long time no blog, I know. I would love to sit down regularly and update this thing. I am envious of the time and discipline of bloggers who update every day. I follow a couple of blogs that post daily and I love to read them. My goal is once a month. So far I am not hitting that goal :) but I am getting there!
I have SO BUSY! I have lots of new students and they are fantastic! Also, I have suddenly been hit with many new clients who have naked windows for me to cover. And then there was halloween.
I love halloween!!!!! I love pumpkins and halloween decorating. I love everything about halloween- especially getting to wear a costume. And since I now have my own darling mini-me who shares my love of dressing up- I have two costumes to make each year.
This year, Eden decided she wanted to be a princess. Ok. We can do that. But I would not allow her to cheat and go the disney route. We had to make it unique. Also, Eden wanted us to match. I found a costume pattern that came in a child size as well as an adult size. We decided to do as princess and queen going to a masquerade ball. My plan was for us to both have matching dresses, her in pink & white and mine in black & red and masquerade masks.


We decided to do Eden's in Pink & White. Here she is!

To save a bit of money I used Wright lace hem tape for the edges of the sleeves- it was three yards for about $2 . I gathered it using my handy dandy ruffler foot. I also used the Wide lace hem tape for the trim all along the edge, where the pink meets the white. It turned out to be MUCH less expensive that buying pre-gathered lace trim.


Doesn't she look like a pretty frosted cupcake?

Sleeve detail:


I ordered the mask on Etsy from Lyssane. You can visit her beautiful shop here:

The mask was perfect!! Absolutely exquisite! I loved the attention to detail- there were little sparkles inside the flowers and all of the ribbon pieces were neatly tucked inside. The mask was even lined on the inside with super soft felt so it was super comfy for Eden to wear. The mask made the outfit!! If you need a mask- don't go anywhere else! It was perfect!


My dress was completed at the very last minute. I had planned on more time but woops! Ran out! I used a different method (pivoting the pieces ) to alter the bodice and I wish I had stuck with my normal method ( painstakingly cutting them apart and piecing ). After making up two muslin test versions, I still wish I had had time to alter it once more. I changed the front to a lace up detail, instead of the bows on the pattern. I also added in a piece at the top of the bodice so that it was not so low. ( I was asked to read to Eden's class for Halloween and I really felt that the dress was just a bit too revealing for 2nd graders.) Also, to read for her class I needed to be a story book character. So at the very last second, I changed my costume into the Queen of Hearts from Alice in Wonderland. I appliques hearts onto the front of the dress. I ended up not needing a mask. I drew hearts on my face and my lipstick was heart shaped.


(You can see my husband and Eden in the reflection in the glass door :) )

Here I am after I read to Eden's class.


My Mini-Me & Me
I used a satin edge stitch for my sleeves as I was not going for the 'frosted cupcake' look of Eden's dress.


Happy Halloween!